Layton ServiceDesk - Viewing and Editing Requests
Overview
List View
The default list view seen by all Analysts is configured in Administration > Global List View > Default Request. This can be changed by individual Analysts in their List View Settings.
List View Filters
When entering the system as a support Analyst you have various options or Menu items to display Request List Views so you can edit and progress Requests. The Analyst’s default Request List View can be set by going to My Settings | Home Screen | View Requests Home Screen. By default the Request List View home screen is set to “My Assigned Requests”. All Request list views display the same data field columns and a summary of the most common views is described below:
My Assigned Requests (Open)
Open Requests that have been assigned to you.
My Owned Requests (Open)
Open Requests that are Owned By you.
Unassigned Requests
Any Open Unassigned Requests.
My Assigned Requests (All)
Requests that have been assigned to you, regardless of status.
My Owned Requests (All)
Open Requests that are Owned By you, regardless of status.
Assigned Requests In My Group (Open)
Unassigned Requests In My Group (Open)
Assigned Requests In My Group (All)
Unassigned Requests In My Group (All)
Unassigned Requests In My Group (Open) & My Assigned Requests (Open)
This combines My Assigned Requests (Open) and Unassigned Requests In My Group (Open)
All Requests In My Group (Open)
All Requests associated with Analyst Groups that you are in, that are not closed.
Open Requests at My Sites
All open Requests located in Sites that the Analyst has been assigned to. Note that this filter does not present only this Analyst's Requests, but all Requests that match the filter.
All Requests at My Sites
All Requests, whether open or closed, located in Sites that the Analyst has been assigned to. Note that this filter does not present only this Analyst's Requests, but all Requests that match the filter.
Requests Outside SLA
Requests at Level 1
Requests at Level 2
Requests at Level 3
All Open Requests
All Open Requests in the system.
All Requests
All Requests, regardless of status. This is a means of listing closed Requests.
You may have your default or Home screen set to view your outstanding Requests or those assigned to you, (My Assigned Requests), so you can quickly see your current workload. The Request List View display can be changed quickly and easily simply by selecting the required view from the drop down filter at the top of the Request List View page.
By selecting the column headings, the list view can be sorted by ascending sequence on that column and by selecting again, the order changed to descending. See Figure 37 for an example of a Requests list view.
The Comments icon identifies whether any comments exist for a request and by selecting the Comments icon the list of Comments associated with that Request will be displayed. The Comments icon will display a tick if any Comments are present and on hovering over the icon the number of Comments will be displayed. If an End User has added a Comment to a Request that has yet to be read by an Analyst then there will be a red exclamation mark on the Comments icon indicating that there is an un-read Comment.
The Tasks icon identifies whether any tasks or actions exist for a Request and by Selecting the Task icon, the list of Tasks associated with that Request will be displayed. If there are Tasks present for that Request there will be a tick against the Task icon and on positioning over the icon, the number of Tasks will be displayed.
The Status icon shows whether the Request is open or closed, although other open Request Statuses can be defined, see the Request Statuses section. By selecting the Status icon you can change the Request Status, i.e. close the Request.
In any of the views above, you can select a Request to view, edit or progress by selecting any data field for a particular Request, e.g. the Request ID, Date, etc. Now the Analyst Request form will be displayed showing all the Request details. Any data field, depending on configuration, can be amended. The Request can be assigned to another Analyst or Group, or completed and closed by clicking the Change Request Status button ![]() .
.
See Logging a New Request Using the Web Interface for details on individual fields and reassigning.
Buttons
Buttons additional to Cancel and Save will now appear on the Analyst Request form to provide the following functions:
| Button | Description |
|---|---|
| Cancel Request Changes | Cancels all changes made to the form and returns to the List View. |
| Request History | Shows details of all changes made to the Request. The date and time stamped changes show Analyst, End User, Type of Change and Field changed. |
| View Tasks | Shows the Tasks associated with Request and allows you to update as required. |
| Change Request Status | The Change Status screen is displayed allowing you to change the Status of a Request. Either to Close, Reopen or any other Status you may have defined. |
| Save Request | Saves the Request changes and unless selected no amendments to the Request will be made. The Analyst Request form is closed and the Home list view is displayed. |
Comments
Viewing Comments
From the Request List View
The Comments column shows, at a glance, the status of comments for every Request by the appearance of its button.
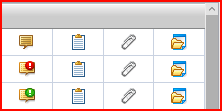
| Button | Status | Description |
|---|---|---|
| No Comments | No comments have been added to the Request. | |
| Comments Unread | There are one or more comments that have not been read by the logged-in Analyst. | |
| Comments Read | There are one or more comments, and they have all been read by the logged-in Analyst. |
Clicking the button will open the Comments list for the Request.
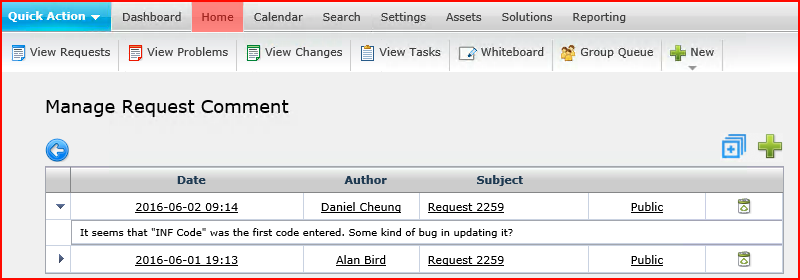
Use the Expand/Collapse All button ![]() to expand or collapse all Comments at once.
to expand or collapse all Comments at once.
From the Request Form View
From the Request form, click the Comment tab![]() .
.

Use the Expand/Collapse All button ![]() to expand or collapse all Comments at once.
to expand or collapse all Comments at once.
Adding a Comment
In the Comments list view, click the Add button ![]() .
.
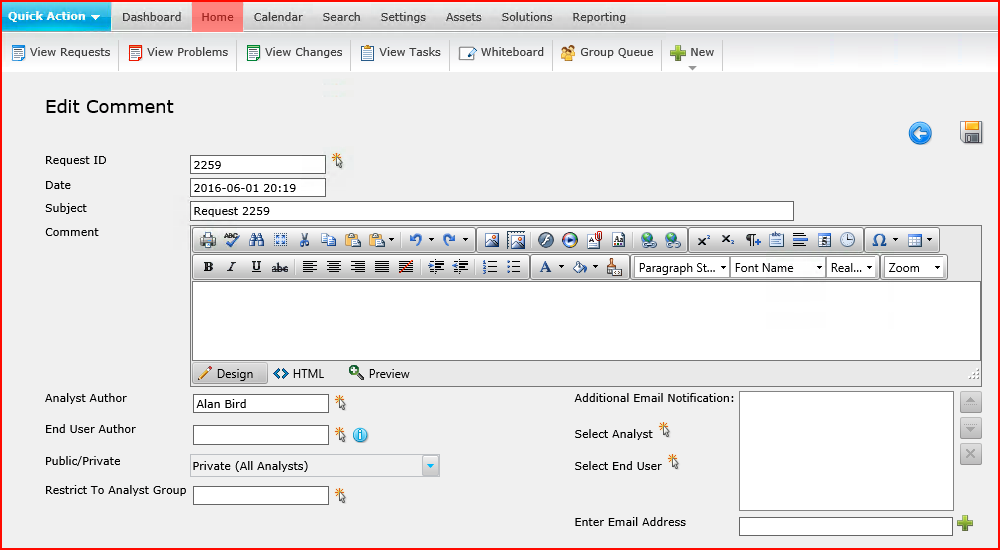
Request ID
This will be pre-populated with the Request ID. There is no need to change this.
Date
The date and time when the new comment form was opened will be pre-populated. This cannot be changed.
Subject
The default subject is Request IDNUMBER. This can be modified if desired.
Comment
The comment body can be styled in the same way that a Request description can be.
Analyst Author
This will be pre-populated with username of the logged-in Analyst who opened the comment form.
End User Author
This will be pre-populated with username of the logged-in End User who opened the comment form in the End User web interface.
Public/Private
Public Comments are viewable by both Analysts and End Users.
Private Comments are viewable by Analysts only.
Note that there is no granularity as to which Analysts can view a private Comment. If you want this level of control, implement this workflow.
The default Comment status of either Public or Private can be set in Administration > General Settings > Security > Global Analyst Security > Default Comment Status. The setting Make Public/Private in Administration > Company Structure > Manage Analyst > ANALYSTNAME > Settings > Comment can determine whether or not the Analyst can change the default Comment status.
Additional Email Notification
If the Request has Comment assigned from Analyst (Notify End User) notification is enabled, when an Analyst adds a public comment to a Request, an email notification will be sent to the End User which contains the details of the comment. Conversely, if the Request has Comment assigned from End User (Notify Analyst) notification is enabled, if the End User adds a comment, an email can be sent to the Analyst that is assigned to the Request.
The Analysts also have an option to select additional Analysts who will be sent an email notification with the details of the comment. This is a one-time operation. Any specified usernames will not be retained for subsequent comments. The comments system is primarily intended for conversation between the End User and the assigned Analyst.
Select Analyst
Click the Select button ![]() to open a dialog where Analysts can be browsed or searched. Click an Analyst to add them to the Additional Email Notification list.
to open a dialog where Analysts can be browsed or searched. Click an Analyst to add them to the Additional Email Notification list.
Select End User
Click the Select button ![]() to open a dialog where End Users can be browsed or searched. Click an End User to add them to the Additional Email Notification list.
to open a dialog where End Users can be browsed or searched. Click an End User to add them to the Additional Email Notification list.
Enter Email Address
An arbitrary email address can be entered in this field and added to the Additional Email Notification list by clicking the Add button ![]() .
.
Removing Recipients from the Additional Email Notification List
Click a recipient and click the Remove button ![]() to the right of the list.
to the right of the list.
Automatic Processing of Comments Via Email
If an End User replies to a comment from an Analyst via email, Layton ServiceDesk can automatically convert this email into a comment on the related request. Layton ServiceDesk will then email the Analyst with the details of the End User’s comment. The setting for this is Auto Import Email Comments in Administration > System Settings > Email Server Settings.
Notification
If the Request has Comment assigned from Analyst (Notify End User) notification is enabled, when an Analyst adds a public comment to a Request, an email notification will be sent to the End User which contains the details of the comment. Conversely, f the Request has Comment assigned from End User (Notify Analyst) notification is enabled, if the End User adds a comment, an email can be sent to the Analyst that is assigned to the Request.
Request Attachments
Request Attachments allow the End User or Analyst to upload files to a Request to act as an attachment. For Example this may be a screen shot of a problem or a copy of a file such as the autoexec.bat file. The End Users access to attachments can be restricted in the system configuration, see Administration > General Settings > Security > Global End User Security > Allow End User Documents.
To attach a file to a Request click on the Request Attachment icon. This will then display the list of attachments on the Request and then click the Add New icon. Clicking the Add New icon will allow you to specify the file location and submit it. It will then appear in the list of attachments.
The Attachment can then be viewed or downloaded by clicking on it. Files that can be opened by the browser are opened in a separate window. Files that can’t be opened by the browser are downloaded and saved to the client PC. Attachments can be deleted by clicking on the Delete Link.
Spawned Request
A Spawned request is a child of an existing Request. For example, if you had a request related to a piece of equipment, you could raise a child for the manufacturer of that equipment. Enabled Spawned Requests in Administration > General Settings > Request Settings > Allow Spawning.
The default system setting will not allow the Parent Request to be closed unless the Spawned Request is closed first. If required, this setting can be changed in Administration > General Settings > Request Settings > Spawn Closure.
To created a Spawned Request, click the Spawn Request button ![]() on the Request form. This will display the Spawned Request form which can be completed and assigned as any other Request. The Request ID number of the Parent Request will be automatically populated in the Spawned From field.
on the Request form. This will display the Spawned Request form which can be completed and assigned as any other Request. The Request ID number of the Parent Request will be automatically populated in the Spawned From field.
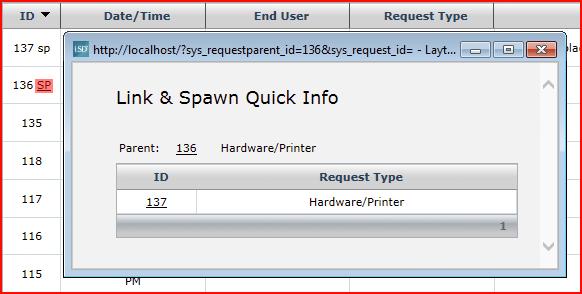
Parent Requests with Spawned Child Requests under them are marked with SP (the Parent) under the Request ID in the Requests List View. Spawned Child Requests with Parents above them are marked with sp (the child) under the Request ID in the Requests List View.

Clicking the SP or sp link in the Request List View will produce a pop-up window which will display the Parent and Child relationship.
Request Costs
The Request Cost feature can be used to record any costs or charges that have been incurred or will be billable as a result of the Request. Costs can be added for Analysts’ time spent or for other billable Items. Items in the Request Cost list can be added in Cost Items.
Analysts’ can be assigned hourly charge rates which will automatically calculate the total cost based on the Analyst’s charge rate and the start and finish times entered. To set the Analyst Charge Rates go to Manage Analyst. Click on the Analyst’s name or username and you will be presented with the Analyst form. By default the Analyst Cost Rate field (sys_requestcost_rate) is displayed on the form where you can enter the Analyst’s default charge rate. If the Analyst Cost Rate field is not displayed on the form see Defining a new field in the form design section for details on how to add this field to the form.
By default the system uses the dollar currency symbol $, however if you use a different currency symbol you can change this in Request Settings > Currency.
To add a new cost transaction or to edit an existing transaction click on the Request Cost icon and you we see a list of current transactions for this Request. To edit an existing transaction click on the appropriate link and to add a new transaction click the Add New button. You are then presented with the cost transaction form; see Figure 38 below for an example.
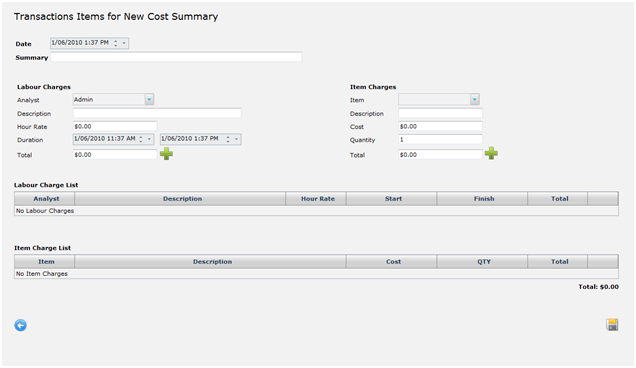
To add a Labor Charge select the appropriate Analyst from the Analyst drop down list, by default this will be set to current logged in Analyst. When the Analyst is selected the Analyst’s default charge rate is populated in the Hour Rate field. A description of the Labor change can be added to the description field.
Once the duration start and end times are entered the total cost will be automatically calculated based on the Analyst’s hourly rate. Once all the details have been entered click the Add button and this will be added to the labor charge list. Multiple labor charges can be added if required along with one or more item changes.
To add an Item charges select the required item from the drop down list. The item description and cost value we be automatically populated based on the valued defined in the Administration | Libraries | Cost Items section. Add the quantity required and then select the Add button to add the item to the Item Charge List.
When the Labor and/or Item Charges have been completed click on the save button and this will take you back to the request form.
