Layton ServiceDesk - Settings - Libraries - Drop Down Lists
From Layton Support
(Difference between revisions)
m (Updated links) |
m (Updated link) |
||
| Line 20: | Line 20: | ||
=Form Design= | =Form Design= | ||
In order for the Drop Down List to be used on any form, a user-defined data field should also be added to the Request table structure in the '''[[Layton ServiceDesk - Configuring the System - Data Design|Data Design]]''' section and then the Drop Down List will be linked to that data field in the Form Design using the ''Add Drop Down List'' button [[File:Lsd btn toolbar combo 32px.png|link=]] on the Toolbar. | In order for the Drop Down List to be used on any form, a user-defined data field should also be added to the Request table structure in the '''[[Layton ServiceDesk - Configuring the System - Data Design|Data Design]]''' section and then the Drop Down List will be linked to that data field in the Form Design using the ''Add Drop Down List'' button [[File:Lsd btn toolbar combo 32px.png|link=]] on the Toolbar. | ||
| − | <p align="right">[[Layton | + | <p align="right">[[Layton ServiceDesk - Settings - Libraries - Brands |<u>Next article in this series: ''Brands''</u>]] [[File:Btn forward.png|link=Layton ServiceDesk™ - Settings - Libraries - Brands]]</p> |
<p align="right">[[File:btn_back_up.png|link=User Guide for Layton ServiceDesk]] [[User Guide for Layton ServiceDesk|<u>Back to Contents</u>]]</p> | <p align="right">[[File:btn_back_up.png|link=User Guide for Layton ServiceDesk]] [[User Guide for Layton ServiceDesk|<u>Back to Contents</u>]]</p> | ||
Latest revision as of 05:00, 30 July 2018
![]() Previous article in this series: Cost Items
Previous article in this series: Cost Items
Contents |
[edit] Overview
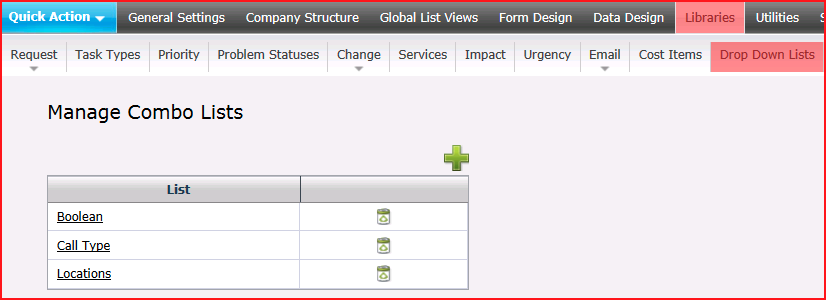
Drop Down Lists are predefined lists that can be applied to forms through the Form Design section. Drop Down Lists are managed under Administration > Libraries > Drop Down Lists.

[edit] New Drop-Down List
- Click the Add button
 .
.
- Enter a name for the list, then click the Save button
 .
.
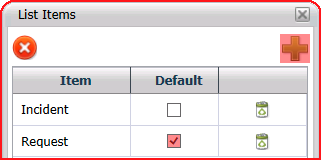
- Click the List name to open the List Items dialog.

- Click the Add button
 to add a new list item.
- Enter the name of the list item and click the Save button
 .
.
- Repeat until all the list items have been created.
- If a default list item when a drop-down list is opened is desired, check the Default checkbox for the appropriate list item.
- Close the dialog.
[edit] Form Design
In order for the Drop Down List to be used on any form, a user-defined data field should also be added to the Request table structure in the Data Design section and then the Drop Down List will be linked to that data field in the Form Design using the Add Drop Down List button ![]() on the Toolbar.
on the Toolbar.