Layton ServiceDesk - Procedures - General - Sending your Database to Support
m (Jpainter moved page Layton ServiceDesk™ - Procedures - General - Sending your Database to Support to Layton ServiceDesk - Procedures - General - Sending your Database to Support: Removed the TM symbol for a cleaner URL) |
m (Updated links) |
||
| Line 1: | Line 1: | ||
| − | <p align="right">[[File:btn_back_up.png|link=User Guide for Layton | + | <p align="right">[[File:btn_back_up.png|link=User Guide for Layton ServiceDesk]] [[User Guide for Layton ServiceDesk|<u>Back to Contents</u>]]</p> |
__FORCETOC__ | __FORCETOC__ | ||
=Overview= | =Overview= | ||
| Line 8: | Line 8: | ||
Collect the following information for later use: | Collect the following information for later use: | ||
| − | #The '''[[Layton | + | #The '''[[Layton ServiceDesk - Procedures - General - How to Find the Version Number|application version]]''' of your installation of Layton ServiceDesk. |
#The version of SQL Server you are using. | #The version of SQL Server you are using. | ||
| − | #The password for the built-in ''admin'' account. If you have security concerns about sending the database out with the admin password, '''[[Layton | + | #The password for the built-in ''admin'' account. If you have security concerns about sending the database out with the admin password, '''[[Layton ServiceDesk - Settings - Company Structure - Manage Analyst|change it]]''' prior to backup and sending. |
==Create Database Backup== | ==Create Database Backup== | ||
| Line 17: | Line 17: | ||
=Preparing the Database for Sending= | =Preparing the Database for Sending= | ||
==Complete Database== | ==Complete Database== | ||
| − | In most instances, you will be sending the complete database. In this case, you can skip to step '''[[Layton | + | In most instances, you will be sending the complete database. In this case, you can skip to step '''[[Layton ServiceDesk - Procedures - General - Sending your Database to Support#Prepare File for Upload|Prepare File for Upload]]'''. |
==Database Without Requests== | ==Database Without Requests== | ||
| Line 29: | Line 29: | ||
SET sys_requeststatus = 0 | SET sys_requeststatus = 0 | ||
| − | 3. Preferably, in your test Layton ServiceDesk installation, or if you don't have one, your live installation (this will be disruptive to anyone using the system, so do it when users are offline), launch DBTool to '''[[Layton | + | 3. Preferably, in your test Layton ServiceDesk installation, or if you don't have one, your live installation (this will be disruptive to anyone using the system, so do it when users are offline), launch DBTool to '''[[Layton ServiceDesk - Installation - Connect to Existing Database|Connect to Existing Database]]'''. This will connect Layton ServiceDesk to the database copy. |
| − | 4. Launch Layton ServiceDesk and purge all closed Requests per '''[[Layton | + | 4. Launch Layton ServiceDesk and purge all closed Requests per '''[[Layton ServiceDesk - Utilities - Purging#Requests|this procedure]]'''. |
5. In Layton ServiceDesk, check that there are no Requests. If you want to do this in Management Studio, use this query. The result should be ''0'': | 5. In Layton ServiceDesk, check that there are no Requests. If you want to do this in Management Studio, use this query. The result should be ''0'': | ||
| Line 53: | Line 53: | ||
=Send the Database= | =Send the Database= | ||
Send the .zip file to Support via our secure '''[http://laytontech.leapfile.net upload service]'''. | Send the .zip file to Support via our secure '''[http://laytontech.leapfile.net upload service]'''. | ||
| − | <p align="right">[[File:btn_back_up.png|link=User Guide for Layton | + | <p align="right">[[File:btn_back_up.png|link=User Guide for Layton ServiceDesk]] [[User Guide for Layton ServiceDesk|<u>Back to Contents</u>]]</p> |
Revision as of 23:23, 6 December 2016
Contents |
Overview
On occasion, Support may need to examine your database to understand the cause of an issue or to repair your database. There is a preparatory procedure, and two different procedures depending on whether you will be sending the whole database or the database without Requests.
Preparatory Steps
Gather Information About the Database
Collect the following information for later use:
- The application version of your installation of Layton ServiceDesk.
- The version of SQL Server you are using.
- The password for the built-in admin account. If you have security concerns about sending the database out with the admin password, change it prior to backup and sending.
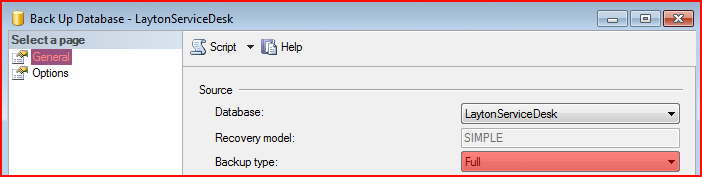
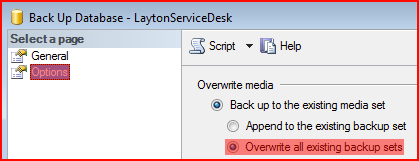
Create Database Backup
- Use SQL Server Management Studio (SSMS) to back up the SQL database to a .bak file. Note the following settings:
Preparing the Database for Sending
Complete Database
In most instances, you will be sending the complete database. In this case, you can skip to step Prepare File for Upload.
Database Without Requests
If there is a security concern regarding the contents of the database, you can strip out all the Requests prior to sending.
1. In Management Studio, restore the database backup you just made, with a different name, in order to produce a copy.
2. In Management Studio, on the database copy, run this query to set the status of every Request to Closed:
   UPDATE  request
   SET     sys_requeststatus = 0
3. Preferably, in your test Layton ServiceDesk installation, or if you don't have one, your live installation (this will be disruptive to anyone using the system, so do it when users are offline), launch DBTool to Connect to Existing Database. This will connect Layton ServiceDesk to the database copy.
4. Launch Layton ServiceDesk and purge all closed Requests per this procedure.
5. In Layton ServiceDesk, check that there are no Requests. If you want to do this in Management Studio, use this query. The result should be 0:
   SELECT  COUNT(sys_request_id)
   FROM    request
Prepare File for Upload
Rename the Backup File
Please use this naming convention for the backup file:
lsd_VERSION_sqlVERSION_YEARMONTHDAY.bak
For example, if you were backing up a version 6.5.9 database running on SQL Server 2008 R2 on 25 Jan. 2016, the resultant filename would be:
lsd_659_sql2008r2_20160125.bak
Zip the Backup File
Important! You must zip the file before sending to greatly reduce its size.
Send the Database
Send the .zip file to Support via our secure upload service.