Layton ServiceDesk - Utilities - LDAP Import End User
Contents |
Overview
The LDAP End User import function allows you to connect to an Active Directory server or multiple servers and pull back user information. The import may be processed manually and it can also be configured to allow Layton ServiceDesk to automatically create and update (but not remove) End Users from information captured from Active Directory. The Map Fields button may be used to ensure that all required data is captured, and the Filter Users button provides the ability to select which OUs or Users are imported.
The import process checks Active Directory against the existing End Users. Any new ones are added. Existing ones are not reimported.
Field Matching
The user name in Active Directory is matched to euser.sys_eusername in the Layton ServiceDesk database. For example, if the Active Directory user name is HankA, Layton ServiceDesk looks for a HankA in its database, and this is used to determine if it has been imported or not.
Multiple Configurations
Note that it is possible to create multiple connections to the same server. This is useful for targeting specific OUs. With a BaseDN specific to an OU, it reduces the number of items displayed in the Filter dialog. This also improves performance.
Setting up the LDAP (Active Directory) Connection
LDAP List
To set up an LDAP connection, go to Administration > Utilities > LDAP (AD) Import End User to load the End User LDAP List:
Add LDAP Server
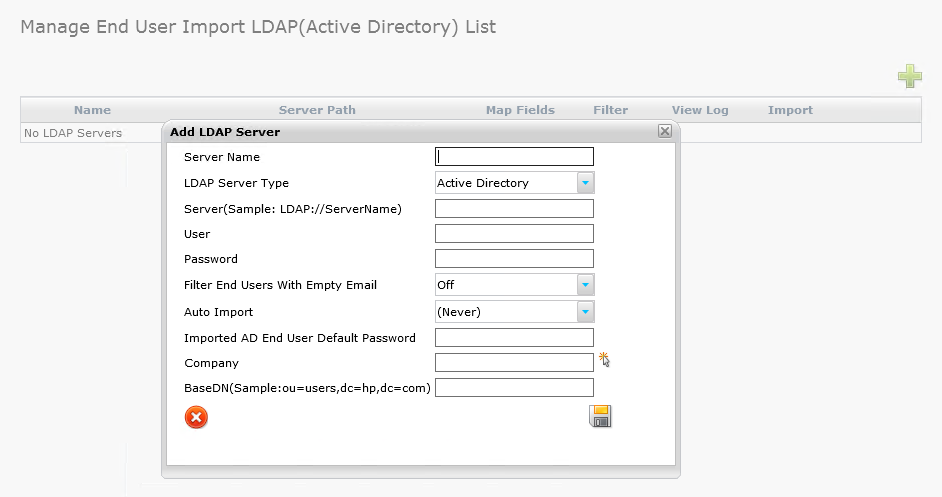
Any existing LDAP connections will be displayed in the table. To create a new connection, click the Add button ![]() and a dialog will appear:
and a dialog will appear:
Setting Descriptions
Server Name
This is simply a name used to identify this LDAP connection. It is not mandatory and any value can be entered.
LDAP Server Type
Selects the type of LDAP server, currently limited to Active Directory
Server
Enter the LDAP Server address in the following format: LDAP://servername (LDAP must be capitalized)
User
Enter a user account with access to the LDAP server.
Password
Enter the password for the user account specified above.
Filter End Users With Empty Email
Turn this On to import only users with an email address in their LDAP account.
Auto Import
Periodically run the user import based on the selected interval. Daily imports will start the next day. If you are only to run manual imports, you should specify Never. The automatic import is run by the Layton ServiceDesk background process and does not require any Analyst intervention or an Analyst to be logged in the system.
Imported AD End User Default Password
This allows you to specify a default Layton ServiceDesk password for all End Users. This password is only used for access to Layton ServiceDesk when logging in manually and is not the same as the Active Directory password. This setting is useful for new End Users so that the same password can be given out and then changed by the End User, if allowed.
Company
Available only if Company Level has been turned on, this sets the Company for the imported end users. You will need to have created the Companies first in Administration > Users & Groups > Manage Company.
BaseDN
Enter a specific OU to load. The filter may be used to do the same thing. Syntax: ou=users,dc=server,dc=com.
Once the LDAP connection has been saved, it will be displayed in the list of LDAP connections along with options to Map fields, Filter Users & Groups, view the log file, and manually run the import.
Map Fields
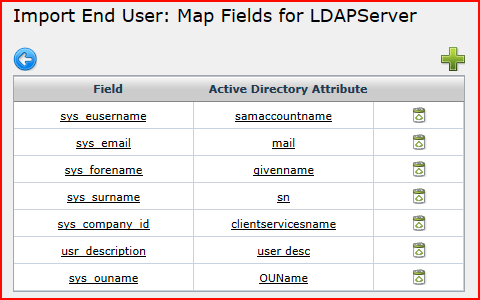
Selecting the Map Fields button will allow you to enter Active Directory attributes and map them to fields in Layton ServiceDesk. There are four fields provided in the default configuration to import the username, email address, first name, and last name:
These values will be transferred from Active Directory into the mapped ServiceDesk field during the import. If the sys_eusername field is removed, it will be mapped by default to the login name of the directory user. The Active Directory attribute is a free type field as Versions of Active Directory are extensible and can have custom attributes attached to them. A list of standard Active Directory Attributes for 2000/2003 domains are shown below:
| 2000 Server Domain | 2003 Server Domain | Fields to Map |
|---|---|---|
| sys_email | ||
| name | samaccountname | sys_eusername |
| givenname | givenname | sys_forename |
| sn | sn | sys_surname |
| department | department | sys_eclient_id |
| DisplayName | DisplayName | Map to user-defined field |
To obtain a complete list of LDAP attribute names, see next section.
OU Name
While not part of a default set of field mappings, the End User table field sys_ouname must be mapped to the applicable field on the LDAP server in order to use it in Business Rules.
Retrieving Additional Active Directory Attributes
Above are the most common settings for most domains, however these may not work in every environment. The most effective way to obtain the LDAP mappings for your domain is to run the LDP tool.
- Log into the LDAP server as a domain admin.
- Run LDP.exe.
- From the Connection menu, click Connect. In the Connect pop up, ensure the Domain controller's machine name appears, and leave the rest as default, then click OK. You should now see some information about the Active Directory schema.
- From the Connection menu, click Bind. A Bind window will pop up asking for your user name and password. Enter these credentials, then ensure the correct domain name appears in the Domain box, then click OK.
- Click the View menu and select Tree. A Tree view pop up will appear, asking for a BaseDN. Leave it blank and click OK.
- In the left-hand pane, you should now see a tree structure of the different OUs that have been created in Active Directory.
- Expand an OU. You should now see a list of users identified as an LDAP string. Double-click one of the user strings in the left-hand pane. In the right-hand pane, you should now see the user within the pane. All LDAP attribute names are now clearly identified showing something like this:
Expanding base 'CN=Glenn Parker,CN=Users,DC=domain,DC=local'...
Result <0>: (null)
Matched DNs:
Getting 1 entries:
>> Dn: CN=Glenn Parker,CN=Users,DC=domain,DC=local
1> memberOf: CN=users,CN=Builtin,DC=domain,DC=local;
1> accountExpires: 9223374567854775807;
1> adminCount: 0;
1> badPasswordTime: 14658789812203906250;
1> badPwdCount: 1;
1> codePage: 0;
1> cn: Glenn Parker;
1> countryCode: 0;
1> department: Accounting;
1> displayName: Glenn Parker;
1> mail: [email protected];
1> givenName: Glenn Parker;
1> instanceType: 4;
1> lastLogoff: 0;
1> lastLogon: 127590245253906250;
1> logonCount: 2;
1> distinguishedName: CN=Glenn Parker,CN=Users,DC=domain,DC=local;
1> objectCategory: CN=Person,CN=Schema,CN=Configuration,DC=domain,DC=local;
4> objectClass: top; person; organizationalPerson; user;
1> objectGUID: 5a3456cb-9723-4r123-8172-06231223b048;
1> objectSid: S-15-B2768d30-1E9285F2-8Fc3EE1G-414;
1> primaryGroupID: 513;
1> pwdLastSet: 127590244556093750;
1> name: Glenn Parker;
1> sAMAccountName: Gparker;
1> sAMAccountType: 8023016168;
1> userAccountControl: 64546;
1> userPrincipalName: [email protected];
1> uSNChanged: 52347;
1> uSNCreated: 6719;
1> whenChanged: 4/26/2005 17:27:35 Eastern Standard Time `Eastern Standard Time;
1> whenCreated: 8/23/2004 8:52:4 Eastern Standard Time Eastern Standard Time;
Note: Any fields to be imported from Active Directory that are not already identified in Layton ServiceDesk (e.g. Address, State, Zip, etc.), will need to be added to the user table in Administration > Data Design > End User Data. Once you have added your custom fields, go Form Design > End User to add the new user-defined fields. When the import runs, it will allow you to populate these fields.
Filter
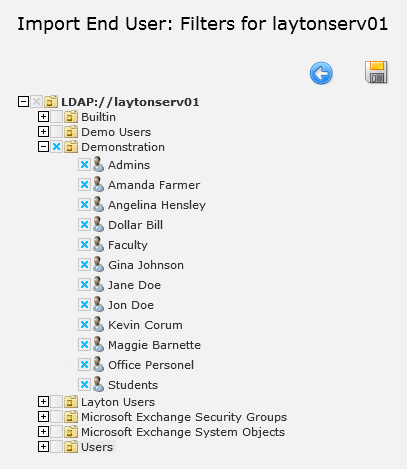
The filter loads the entire OU into a tree structure allowing you to select the users and groups to be included in the import. Navigate the directory structure and select the desired objects, then click save to include them in the import.
View Log
Every manual and automatic LDAP import action will record a log file. The log files are listed in this table, where they may be downloaded, viewed, and deleted.
Import
The LDAP Active Directory import will run automatically according to the setting specified in the Auto Import section of the LDAP Server settings. If this field was set to Never, the import may be run manually by clicking the Import Users button ![]() . This runs the Import in three steps and outputs the results to a log file.
. This runs the Import in three steps and outputs the results to a log file.
- The import checks for all End Users in Layton ServiceDesk that are not in Active Directory. These users are written to the Log file. They can be dealt with by the Layton ServiceDesk Administrator at a later time.
- The import checks for all End Users in Layton ServiceDesk that are present in Active Directory. If they are included in the Filter, then these users are updated with data from Active Directory and written to the Log file.
- The import checks for all users in Active Directory that are not listed as End Users in Layton ServiceDesk. If they are selected in the filter, then Layton ServiceDesk will create these End Users from Active Directory. These users are also written to the Log file.
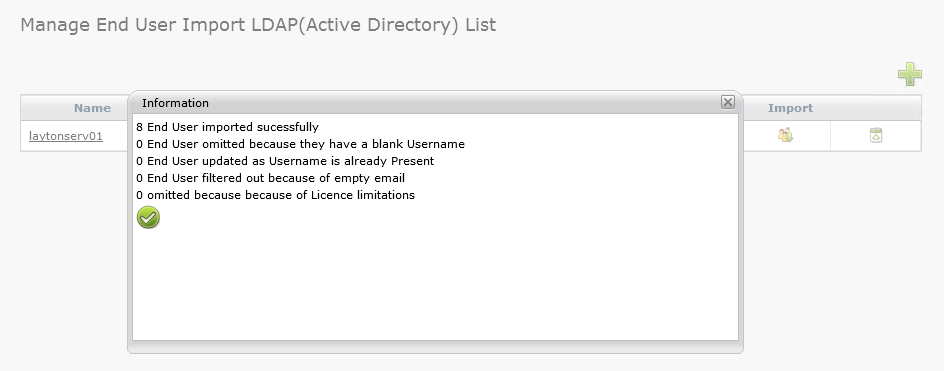
For example, this is the result of importing 8 new end users:
Disabling End Users Automatically on Import
If an End User account is disabled in Active Directory, then either when the schedule runs or a manual import is run, the End User account in Layton ServiceDesk will be disabled.
Delete
This option is used to remove LDAP connections that are no longer needed.
Editing an LDAP Server Connection
You can edit a connection by clicking its Name or Server Path in the Manage End User Import LDAP (Active Directory) List. Make any required changes, then click the Save button ![]() .
.
Important: You must restart the LaytonServiceDesk Windows service in the Windows Services console or the old server details will still be in effect.


