Layton ServiceDesk - General Settings - Request Settings
Overview
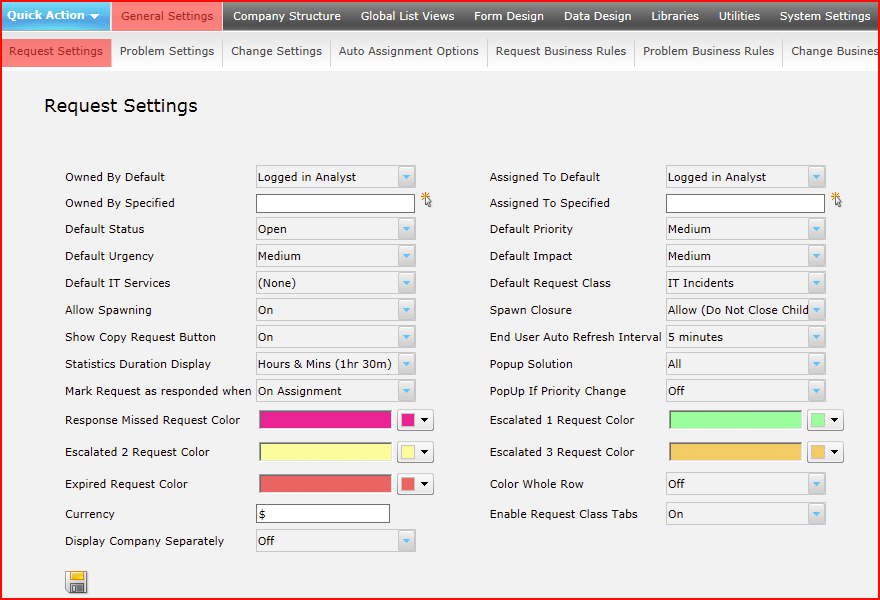
This section contains settings that will determine the default values when a new Request is logged, such as the assignment & ownership, default Status, Priority and other fields along with the escalation colors and a number of other configuration settings.
Ownership & Assignment

Ownership
Owned By Default
This specifies the default value for the Request Owned By field when a new request is logged by the Analyst in the web interface.
Decide who and how Request Ownership will operate and what or whether a default should be used. The normal practice would probably use the Help Desk first line Analysts as always owning a Request, even when the Request is assigned on to a Support Analyst or Group. However, this is totally configurable and you can decide to manually set or transfer ownership at any time, even after a default owner has been specified.
Alternatively you may decide not to use Request Ownership and therefore the Analyst Request form will not include "Owned By" and the default "Owned By Default" will be set to "off".
| Setting | Description |
|---|---|
| Off | Ownership not automatically set |
| Logged in Analyst (default setting) | Ownership defaults to Analyst logging the Request |
| Use Specified | Ownership defaults to the Analyst Specified. The specified Analyst can be selected by clicking the select button next to the Owned By Specified field. |
Owned By Specified
When Owned By Default is set to Use Specified, use this field to select the default analyst. This will default all requests to ownership by the selected analyst. You can still modify each request's ownership if desired.
Assignment
Assigned To Default
Specifies the default value for the request "Assigned To" field when a new Request is logged or a new End User Request is logged. There are three options:
| Setting | Description |
|---|---|
| Off | Assignment not automatically set |
| Logged in Analyst (default setting) | Assignment defaults to Analyst logging the Request |
| Use Specified | Assignment defaults to the Analyst Specified. The specified Analyst can be selected by clicking the select button next to the Assigned To Specified field. |
Assigned to Specified
When Assigned To Default is set to Use Specified, use this field to select the default analyst. This will default all requests to assignment to the selected analyst. You can still modify each request's assignment if desired.
Status, Priority
Default Status
This defines the default Status for newly created Requests. Requests Statuses are defined in Administration > Libraries > Request Statuses. For more information see the Request Statuses section.
Default Priority/SLA
This defines the default Priority for newly created requests when created by an Analyst or the End User in the web interface. Note that this will not set the Priority for Requests created from emails. See this workflow for a configuration that will set the default Priority for new Requests created by any method.
If the Priority field is not present on the form (common in many configurations), the Priority will be set to (None) on Request creation regardless of the setting.
Requests Priorities are defined in Administration > Libraries > Priority / SLA. For more information see the Priority / SLA section.
Default Urgency
This defines the default Urgency for newly created requests. Urgencies are defined in Administration > Libraries > Urgency. For more information please see the Urgency section.
Default Impact
This defines the default Impact for newly created requests. Impacts are defined in Administration > Libraries > Impact. For more information please see the Impact section.
Default IT Services
This defines the default Service for newly created requests. Services are defined in Administration > Libraries > Services. For more information see the Services section.
Default Request Class
This defines the default request class for email requests. Incoming email requests will be automatically placed in this request class. To configure request classes, go to Administration > Libraries > Request Classes
Spawning
Allow Spawning
This option determines whether Request Spawning will be allowed. For more please see Spawn Request. If turned off the Spawn Request icon will not be displayed on the Analyst Request From.
Spawn Closure
Spawn closure determines how Spawned or Linked Requests are handled when the parent Request is closed. The options are:
| Setting | Resulting Action |
|---|---|
| Allow (Only after Children are closed) | The parent Request can only be closed once any Spawned or Linked child requests are closed. |
| Allow (Close Children) | When the parent Request is closed any Spawned or Linked Child requests will be automatically closed. |
| Allow (Do not close Children) | If the parent request is closed any Spawned or Linked child requests will be left open. |
Show Copy Request Button
Allows the Copy Request to New button ![]() to appear on the request form. This feature was designed to copy and duplicate a request entirely, including the comments, tasks, and attachments. If set to Off, the Copy Request to New button will be hidden from the Analyst Request forms.
to appear on the request form. This feature was designed to copy and duplicate a request entirely, including the comments, tasks, and attachments. If set to Off, the Copy Request to New button will be hidden from the Analyst Request forms.
End User Auto Refresh Interval
This sets the amount of time between each auto-refresh for the end users.
Statistics Duration Display
Determines how the HD Mins (sys_hdmins) and 24 HR Mins (sys_24hrmins) fields are displayed on the request forms. The HD Mins field will display the amount of time that a request has been open, taking into account the Working Hours and any closed periods or suspensions. The 24 HR Mins shows the amount of time that a request has been open on a full 24 hour basis. The display options are Hrs & Mins (1hr 30m) or Decimal (1.5).
Pop Up
Pop Up Solution
This field is used to determine if Layton ServiceDesk will prompt an Analyst when a request is being logged that there is a possible solution to the Request Type that they have selected. For more information on Solution Pop Ups please see the Solution Pop-Ups section. The options are:
| Setting | Description |
|---|---|
| None | Turns off the Solutions Pop Ups, irrespective of whether individual Solutions have the Solution Pop up field set to Yes. |
| Specified Only | Will only pop up Solutions linked to the Request Type that have the Solution Pop Up field set to Yes. |
| All | Will pop up all Solutions linked to the Request Type, irrespective of whether the individual Solutions have the Solution Pop Up field set to Yes or No. |
PopUp If Priority Change
A pop up can be generated if the Priority changes.
Mark Request as Responded When
This setting determines when a request is considered to have been responded to. For more information on Request Response please see the Priority / SLA section. If this is set to "On Assignment", when a request is assigned to an Analyst it is marked as responded. If this is set to "On First Public Comment" the request will only be marked as responded when an Analyst adds a Public Comment. A Public Comment is a comment that the End User can view and a copy of the comment will be emailed to them.
Color Options
These settings will determine the color indicator that will be applied to any Requests, Tasks (Actions) or Problems that have reached that particular level of escalation. The system provides up to three levels of escalation before expiry. You can select a color against any level (or none) and as a Request, Task or Problem reaches each level the color in the list views will change color to that specified. The escalation and expiry parameters are set against a Priority or Service Level Agreement. See the Priority and Service Level Agreements section for further details.
| Setting | Color | Code | Description |
|---|---|---|---|
| Response Missed Request Color | #FF1493 | Requests that have not been responded to in time. | |
| Escalated 1 Request Color | #99FF99 | Requests that have been escalated to level 1. | |
| Escalated 2 Request Color | #FFFF99 | Requests that have been escalated to level 2. | |
| Escalated 3 Request Color | FFCC66 | Requests that have been escalated to level 3. | |
| Expired Request Color | #FF6666 | Requests that have expired. |
Color Whole Row
This setting determines if the escalation color settings as described above will be applied to the whole row in the list view or just applied to the Priority cell.
Currency
Determines the currency symbol used in the Request Cost sheets and reports.
Enable Request Class Tabs
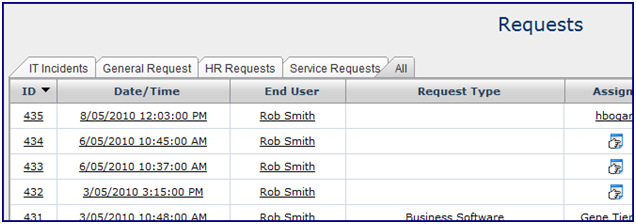
If Request Classes are being used this setting determines if the list views for the different Request Classes are displayed in different tabs or if they will be displayed in a single list. Figure 55 and Figure 56 below show the result of the two settings (Please note that Request Class Tabs are only applicable to the Analyst’s request list views not End Users). For more information on Request Classes please see the Request Classes section.
Request Class Tabs Disabled

Request Class Tabs Enabled

Display Company Separately
Change Closed Request status on User Comment to
If an End User sends a comment email to Layton ServiceDesk for a closed Request, the status can be changed to one of type Continue or Suspend. Select the desired status in the menu.
