Layton ServiceDesk - Settings - System Settings - Exchange Online Settings
m (Added note about "Password" field.) |
(Added section "EAGetMail") |
||
| (6 intermediate revisions by one user not shown) | |||
| Line 3: | Line 3: | ||
__FORCETOC__ | __FORCETOC__ | ||
=Overview= | =Overview= | ||
| + | [[File:Lsd exchange online settings.png|center|link=]] | ||
| − | + | =Special Notes= | |
| − | =Special | + | |
Please consult with your mail-server admin for these details before contacting support. The email system is reliable. The details entered are the only variables. | Please consult with your mail-server admin for these details before contacting support. The email system is reliable. The details entered are the only variables. | ||
Don't configure the settings in '''[[Layton ServiceDesk - Settings - System Settings - Email Server Settings|Email Server Settings]]'''. Those settings are not relevant in an Exchange Online environment. | Don't configure the settings in '''[[Layton ServiceDesk - Settings - System Settings - Email Server Settings|Email Server Settings]]'''. Those settings are not relevant in an Exchange Online environment. | ||
| − | <span style="color:red">'''This is a brand-new feature as of 6.9.0. It was produced on an emergency basis to support Advanced Authentication in Exchange Online | + | <span style="color:red">'''This is a brand-new feature as of 6.9.0. It was produced on an emergency basis to support Advanced Authentication in Exchange Online as Basic Authentication was being deprecated. As a result, the interface is subject to changes in subsequent versions.'''</span> |
| + | |||
| + | ==EAGetMail== | ||
| + | From '''[[Layton ServiceDesk - Release Notes - Version 6.9.0|version 6.9.0]]''' the component ''EAGetMail'', from EmailArchitect, was incorporated into Layton ServiceDesk, to support connection to Exchange Online. | ||
| + | |||
| + | If valid Exchange Online settings are not working, please see these articles from the EmailArchitect website: | ||
| + | |||
| + | *'''[https://www.emailarchitect.net/eagetmail/ex/c/23.aspx#create-your-application-in-azure-portal|Create Your Application in Azure (now ''Microsoft Entra'') Portal]'''. | ||
| + | *'''[https://www.emailarchitect.net/eagetmail/ex/c/24.aspx Retrieve Email Using Microsoft OAuth 2.0 + EWS/IMAP4/Graph API Protocol from Office 365 Account]'''. | ||
==Changing Email Server Settings== | ==Changing Email Server Settings== | ||
| Line 26: | Line 34: | ||
#Enter the Tenant ID in the ''Tenant ID'' field. | #Enter the Tenant ID in the ''Tenant ID'' field. | ||
#Enter the Client Secret in the ''Client Secret'' field. | #Enter the Client Secret in the ''Client Secret'' field. | ||
| − | #The ''Display Name'' field is | + | #The ''Display Name'' field is the name that will appear as the Author of the email. Functionally equivalent to the field on the '''[[Layton ServiceDesk - Settings - System Settings - Email Server Settings#Display Name|Email Server Settings]]''' page. |
#Enter the Exchange Online username, in the format ''name@domain'', in the ''User Email'' field. | #Enter the Exchange Online username, in the format ''name@domain'', in the ''User Email'' field. | ||
| − | + | #Click the ''Test Settings'' link. This will generate an Access Token, which will appear in the ''Access Token'' field. | |
| − | #Click the '' | + | #A dialog will open where you can enter an email address. Enter a test email addressClicking the ''Save'' button [[File:Lsd btn save.png|link=]] will send the email. if the settings are correct, and the test email was entered correctly, you will see a success dialog, and the test email should be received at the test email account. |
| − | # | + | #Click the ''Confirm'' button [[File:Lsd btn confirm 24px.png|link=]] to close the dialog. |
| + | #Click the ''Save'' button [[File:Lsd btn save.png|link=]] to save the settings. | ||
=Queues= | =Queues= | ||
Latest revision as of 02:43, 3 January 2024
![]() Previous article in this series: Email Server Settings
Previous article in this series: Email Server Settings
Contents |
[edit] Overview
[edit] Special Notes
Please consult with your mail-server admin for these details before contacting support. The email system is reliable. The details entered are the only variables.
Don't configure the settings in Email Server Settings. Those settings are not relevant in an Exchange Online environment.
This is a brand-new feature as of 6.9.0. It was produced on an emergency basis to support Advanced Authentication in Exchange Online as Basic Authentication was being deprecated. As a result, the interface is subject to changes in subsequent versions.
[edit] EAGetMail
From version 6.9.0 the component EAGetMail, from EmailArchitect, was incorporated into Layton ServiceDesk, to support connection to Exchange Online.
If valid Exchange Online settings are not working, please see these articles from the EmailArchitect website:
- Your Application in Azure (now Microsoft Entra) Portal.
- Retrieve Email Using Microsoft OAuth 2.0 + EWS/IMAP4/Graph API Protocol from Office 365 Account.
[edit] Changing Email Server Settings
If you need to change your email server settings, please schedule a time when you can change them, then restart the World Wide Web Publishing Service and LaytonServiceDesk service in the Windows Services console. Restarting the World Wide Web Publishing Services is disruptive and Layton ServiceDesk will be unavailable to users while it is restarting.
Failure to restart these services will not purge the old details from memory, and Layton ServiceDesk will continue to try to use the old settings, causing failures to import and send mail.
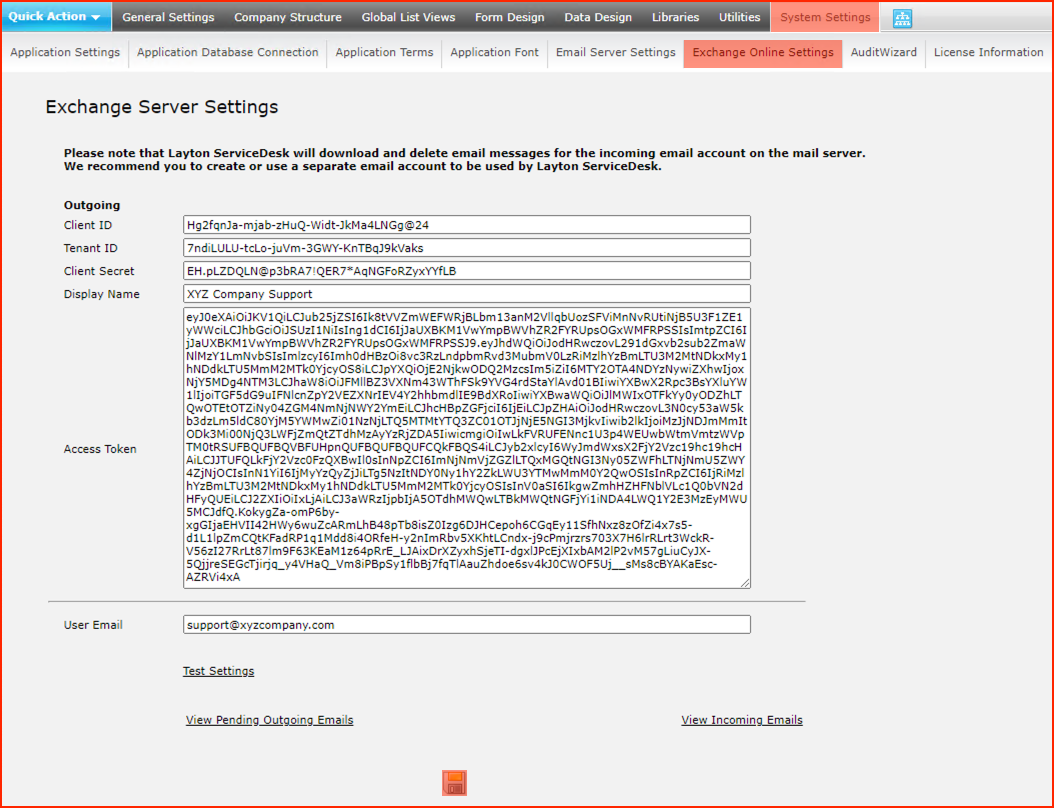
[edit] Configuration
- Obtain from your Exchange Online provider, the following values:
- Client ID
- Tenant ID
- Client Secret
- Exchange Online username, in the format name@domain.
- Enter the Client ID in the Client ID field.
- Enter the Tenant ID in the Tenant ID field.
- Enter the Client Secret in the Client Secret field.
- The Display Name field is the name that will appear as the Author of the email. Functionally equivalent to the field on the Email Server Settings page.
- Enter the Exchange Online username, in the format name@domain, in the User Email field.
- Click the Test Settings link. This will generate an Access Token, which will appear in the Access Token field.
- A dialog will open where you can enter an email address. Enter a test email addressClicking the Save button
 will send the email. if the settings are correct, and the test email was entered correctly, you will see a success dialog, and the test email should be received at the test email account.
- Click the Confirm button
 to close the dialog.
- Click the Save button to save the settings.
[edit] Queues
Both the incoming and outgoing mail queues can be viewed.
[edit] Incoming Email Queue
The Incoming Email queue is available on the Exchange Online Settings page by clicking the View Incoming Emails link, or by clicking the Email Queue button in the header. See here for details on how to use the queue.
[edit] Outgoing Email Queue
The Outgoing Email queue is only available on the Exchange Online Settings page by clicking the View Pending Outgoing Emails link. You would not normally need to monitor this page, but would access it to debug outgoing mail.

[edit] Controls
[edit] Re-Send
To force one or more emails to be re-sent, click the checkbox(es) to select individual emails, or the checkbox in the header to select all, then click the Re-Send button above the list. Note that the header checkbox is a toggle that will select and deselect all, alternatively.
[edit] Delete
To delete one or more emails, click the checkbox(es) to select individual emails, or the checkbox in the header to select all, then click the Delete' button above the list. Note that the header checkbox is a toggle that will select and deselect all, alternatively.