Layton ServiceDesk - Settings - Company Structure - Manage Site
m (Implemented new "Previous/Next" links) |
|||
| Line 1: | Line 1: | ||
| + | <p align="right">[[File:btn_back_up.png|link=User Guide for Layton ServiceDesk™]] [[User Guide for Layton ServiceDesk™|<u>Back to Contents</u>]]</p> | ||
| + | <p align="right">[[File:btn_back_up.png|link=Layton ServiceDesk™ - Settings - Company Structure - Manage Department]] [[Layton ServiceDesk™ - Settings - Company Structure - Manage Department |<u>Previous article in this series: ''Manage Department''</u>]]</p> | ||
=Overview= | =Overview= | ||
If your Layton ServiceDesk™ implementation is to support multiple sites, or physical locations, then you will need to define them in '''Administration > Company Structure > Manage Site'''. Sites are defined by a single identifier that must be unique, the Site Name. Like Departments and Companies, Sites can also be created automatically as part of the LDAP (Active Directory) End User Import Feature. If an End User is imported into Layton ServiceDesk and their Site has not already been created, then it will automatically create this Site at the time of import. | If your Layton ServiceDesk™ implementation is to support multiple sites, or physical locations, then you will need to define them in '''Administration > Company Structure > Manage Site'''. Sites are defined by a single identifier that must be unique, the Site Name. Like Departments and Companies, Sites can also be created automatically as part of the LDAP (Active Directory) End User Import Feature. If an End User is imported into Layton ServiceDesk and their Site has not already been created, then it will automatically create this Site at the time of import. | ||
| − | [[File:Manage site panel.png|center]] | + | [[File:Manage site panel.png|center|link=]] |
If you have enabled the '''[[Layton ServiceDesk™ - Settings - System Settings - Application Settings#Company Level|Company Level]]''' option, then a Company may be associated with the Site. The Site form may be modified in '''[[Layton ServiceDesk™ - Settings - Form Design - Site|Administration > Form Design > Site]]'''. | If you have enabled the '''[[Layton ServiceDesk™ - Settings - System Settings - Application Settings#Company Level|Company Level]]''' option, then a Company may be associated with the Site. The Site form may be modified in '''[[Layton ServiceDesk™ - Settings - Form Design - Site|Administration > Form Design > Site]]'''. | ||
| − | + | <p align="right">[[File:btn_back_up.png|link=User Guide for Layton ServiceDesk™]] [[User Guide for Layton ServiceDesk™|<u>Back to Contents</u>]]</p> | |
=Properties= | =Properties= | ||
The default Site properties consist of two fields which are Company Id and Site Id: | The default Site properties consist of two fields which are Company Id and Site Id: | ||
| − | [[File:Manage site properties.png|center]] | + | [[File:Manage site properties.png|center|link=]] |
| Line 21: | Line 23: | ||
| − | [[File:Manage site settings.png|center]] | + | [[File:Manage site settings.png|center|link=]] |
| − | + | {| class="wikitable" border="1" | |
| − | {| class="wikitable" border="1" | + | |- |
| − | ! style="background:# | + | ! style="background:#009999; width: 300px; color: #FFFFFF"|Setting |
| − | ! style="background:# | + | ! style="background:#009999; width: 700px; color: #FFFFFF"|Description |
|- | |- | ||
| Mail Analyst Group When Over Requests Assigned | | Mail Analyst Group When Over Requests Assigned | ||
| Line 37: | Line 39: | ||
| The email notification may be scheduled to send on an interval based on the number of days specified | | The email notification may be scheduled to send on an interval based on the number of days specified | ||
|} | |} | ||
| − | + | <p align="right">[[File:btn_back_up.png|link=User Guide for Layton ServiceDesk™]] [[User Guide for Layton ServiceDesk™|<u>Back to Contents</u>]]</p> | |
=Working Hours= | =Working Hours= | ||
| − | |||
The Site-specific Working Hours allows for a granular configuration of working hours in your organization. To specify the Working Hours, a start time and an end time is entered for each day of the week: | The Site-specific Working Hours allows for a granular configuration of working hours in your organization. To specify the Working Hours, a start time and an end time is entered for each day of the week: | ||
| − | [[File:Manage site working hours.png|center]] | + | [[File:Manage site working hours.png|center|link=]] |
| Line 51: | Line 52: | ||
Combined with '''[[#Working Hours|Working Hours]]''', Closed Periods control the Site's office hours. Any hours that fall within a scheduled Closed Period will not count against the Requests' Priority/SLA times. | Combined with '''[[#Working Hours|Working Hours]]''', Closed Periods control the Site's office hours. Any hours that fall within a scheduled Closed Period will not count against the Requests' Priority/SLA times. | ||
| − | [[File:Manage site closed periods.png|center]] | + | |
| + | [[File:Manage site closed periods.png|center|link=]] | ||
| + | <p align="right">[[File:btn_back_up.png|link=User Guide for Layton ServiceDesk™]] [[User Guide for Layton ServiceDesk™|<u>Back to Contents</u>]]</p> | ||
=Email= | =Email= | ||
| Line 57: | Line 60: | ||
| − | [[File:Manage site email.png|center]] | + | [[File:Manage site email.png|center|link=]] |
| Line 64: | Line 67: | ||
=Delete= | =Delete= | ||
Use the delete button to remove a Site that is no longer in use. | Use the delete button to remove a Site that is no longer in use. | ||
| + | <p align="right">[[Layton ServiceDesk™ - Settings - Company Structure - Manage Company |<u>Next article in this series: ''Manage Company''</u>]] [[File:Btn forward.png|link=Layton ServiceDesk™ - Settings - Company Structure - Manage Company]]</p> | ||
| + | <p align="right">[[File:btn_back_up.png|link=User Guide for Layton ServiceDesk™]] [[User Guide for Layton ServiceDesk™|<u>Back to Contents</u>]]</p> | ||
Revision as of 05:41, 21 November 2013
![]() Previous article in this series: Manage Department
Previous article in this series: Manage Department
Contents |
Overview
If your Layton ServiceDesk™ implementation is to support multiple sites, or physical locations, then you will need to define them in Administration > Company Structure > Manage Site. Sites are defined by a single identifier that must be unique, the Site Name. Like Departments and Companies, Sites can also be created automatically as part of the LDAP (Active Directory) End User Import Feature. If an End User is imported into Layton ServiceDesk and their Site has not already been created, then it will automatically create this Site at the time of import.
If you have enabled the Company Level option, then a Company may be associated with the Site. The Site form may be modified in Administration > Form Design > Site.
Properties
The default Site properties consist of two fields which are Company Id and Site Id:
The Company Id field provides a selection tool to find the Company that will be associated with the Site. The Site Id field is a free-type query box which allows you to enter the name of the Site. Like most forms in ServiceDesk, this can be modified to include more fields to meet the needs of your organization. It may be desired to make assign a Site Analyst. To do this, the sys_site_username must be added to the Site form in Administration > Form Design > Site. Then each site may have an Analyst assigned to it, which is required for certain email notifications to be successfully delivered. User-defined fields may also be added to the Site form after the fields have been created in Administration > Data Design > Site Data.
Settings
The Site settings provide options for email notification settings.
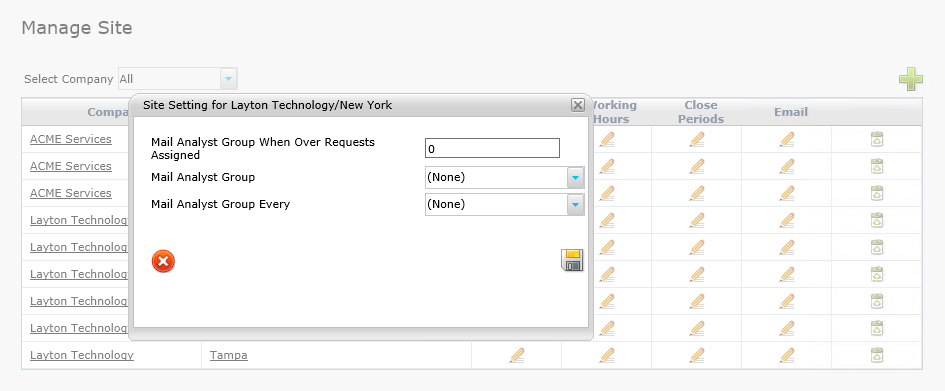
| Setting | Description |
|---|---|
| Mail Analyst Group When Over Requests Assigned | When the number of Requests associated with this Site is greater than this specified value, an email is sent to the Analyst Group specified below |
| Mail Analyst Group | The email notification will be sent to this Analyst Group |
| Mail Analyst Group Every | The email notification may be scheduled to send on an interval based on the number of days specified |
Working Hours
The Site-specific Working Hours allows for a granular configuration of working hours in your organization. To specify the Working Hours, a start time and an end time is entered for each day of the week:
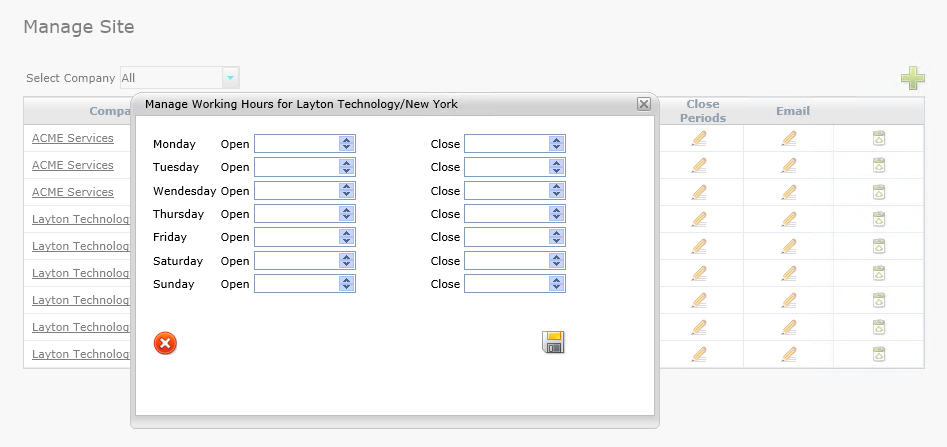
The Priority/SLA time only elapses during Working Hours, given there are no scheduled Closed Periods during that time. Any Request submitted will have Priority/SLA escalation levels working within the End User Site's Working Hours setting. The Site-specific Working Hours will supersede the global Default Working Hours. If your organization spans multiple time zones, then it can be beneficial to use Site-specific Working Hours settings, as the global Default Working Hours will not apply to everyone.
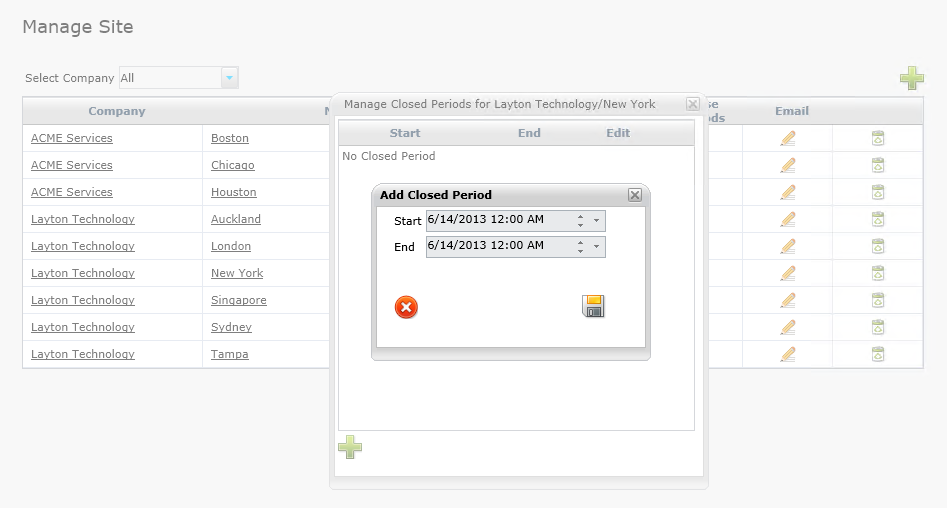
Closed Periods
Combined with Working Hours, Closed Periods control the Site's office hours. Any hours that fall within a scheduled Closed Period will not count against the Requests' Priority/SLA times.
The optional email setting provides for the configuration of unique email server settings for each Site in your ServiceDesk. Please refer to the global Email Server Settings for a detailed description of the ServiceDesk email configuration process.
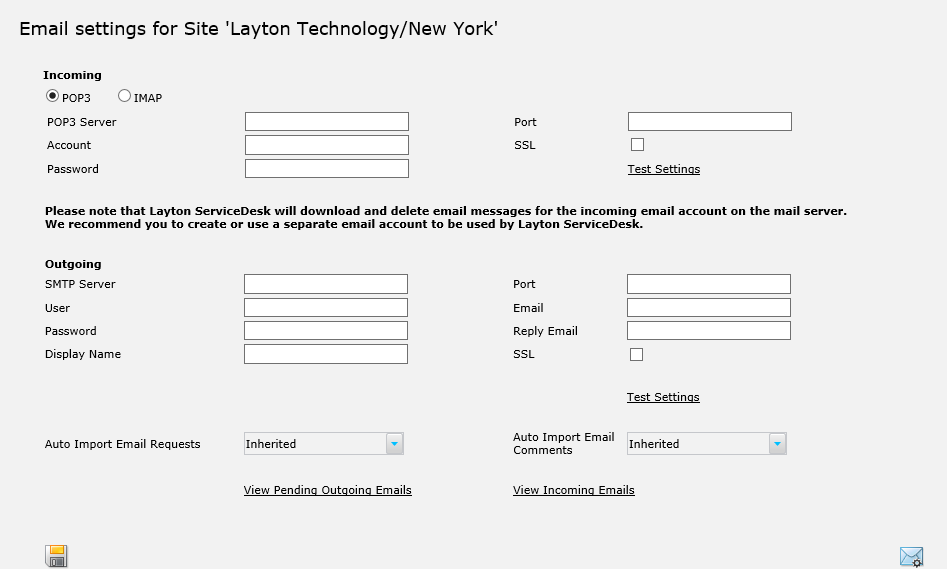
The Site-specific email configuration allows for custom email server connection information specific to each Site. All settings are inherited from the global Email Server Settings until they are customized, then the Site-specific configuration will take precedence. This includes the Auto Import settings, which default to Inherited, but they may also be turned On or Off.
Delete
Use the delete button to remove a Site that is no longer in use.