AuditWizard - Using AuditWizard - Administration - Auditing - AuditScanner Configuration
Overview
Ribbon Commands

Scanner Configuration
New Configuration: Asks you to save the current configuration, if desired, then a set of defaults is displayed for modification, to become the new configuration.
Load Configuration: Load a saved configuration.
Save Configuration: Save the currently displayed settings with the name that appears in the Scanner Name field. If it already exists, you will be asked to confirm.
Scanner Deployment
Deploy to Network: Writes the Scanner executable and configuration file to the network share. This must be done any time the Scanner configuration is changed, in order to output the settings to the configuration file used by the Scanner executable.
Instant Settings
These settings are the minimum you need in order to use the Scanner.
- Go to Administration > Auditing > AuditScanner Configuration.
- Enter the name of your network share in UNC format, \\SERVER\SHARE, in the Network Share Folder field. AuditWizard will populate the Data Folder field based on this information.
- Click the Save Configuration button. This saves the configuration with the name in the Scanner Name field.
- Click the Deploy to Network button. This writes the data and scanner folders to the root of the network share, if not present, then writes AuditScanner.exe and AuditScanner.xml (the Scanner executable and configuration file, respectively) into \\SERVER\SHARE\scanner.
Advanced Settings
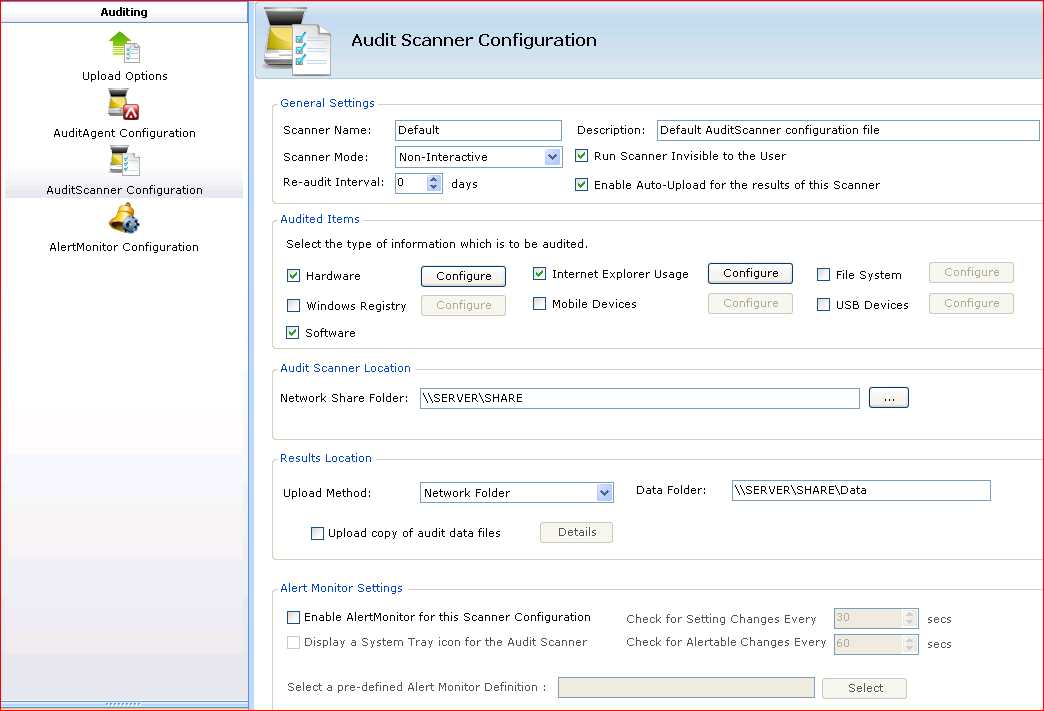
General Settings

Scanner Name
The name for the scanner you are currently running. In addition to the technique of clicking the New Configuration button as noted above, you can create additional configurations by changing the Scanner name, then saving it, which saves a copy with the new name.
Description
Description of the currently loaded Scanner configuration.
Scanner Mode
Non-Interactive
The scanner runs in the background and is not visible to the user.
Interactive
The scanner is visible to the user so they can fill in custom forms.
Pre-Population of Fields
To have the dialog fields pre-populated with the information entered in the past, disable the Overwrite User-Defined Data upload option.
Overwriting Fields
To have the dialog field pre-populated with the information currently being audited, overwriting any manually entered data from past audits, enable the Overwrite User-Defined Data upload option.
Interactive Options
Click the Interactive Options button to open the Interactive Audit Designer dialog.
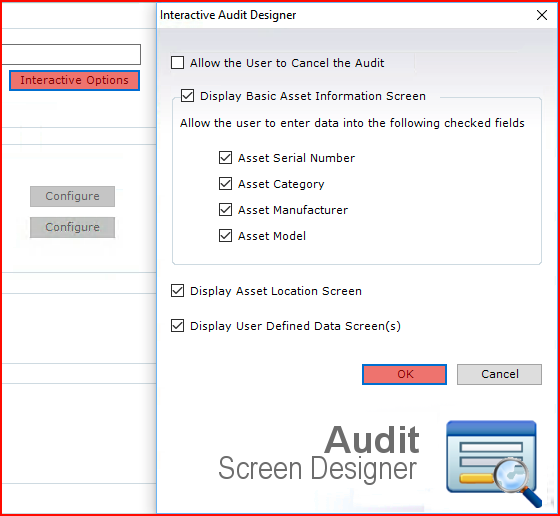
Allow the User to Cancel the Audit
This setting lets the user stop the audit at any time during the dialog interaction.
Display Basic Asset Information Screen
Fields from the Basic Information tab, viewable when an asset is selected in Network View, will be displayed. Four of these fields can be independently displayed or hidden.
Display Asset Location Screen
A separate page of the dialog will present the location structure so that the user can select where the computer is located.
Display User Defined Data Screen(s)
A separate page of the dialog will present the user-defined fields, one page per user-defined data category.
First Time Interactive
The Scanner runs interactively the first time, then is invisible for subsequent audits. Useful for newly deployed computers that you want to get certain data from, but don't want users to see on a regular basis.
Re-audit Interval
The number of days that will pass before another audit is done. 0 is used to indicate that an audit will be done every time the Scanner runs.
Run Scanner Invisible to the User
Unchecking this option will place a notification icon in the notification area of the taskbar. The icon indicates that the Scanner is running.
Enable Auto-Upload for the results of this Scanner
There is a global setting that you can use to enable or disable automatic uploading in Upload Options. If you want to disable an individual configuration, load the configuration, uncheck this option and save the configuration.
Audited Items

Hardware
Various attributes of the computer. Turn general classes on or off by clicking the Configure button.
Internet Explorer Usage
History of websites visited and stored cookies. Turn these options on or off by clicking the Configure button.
File System
You can specify types of files to be scanned.
- Check the File System checkbox.
- Click the Configure button. The File System Audit Details dialog will open:
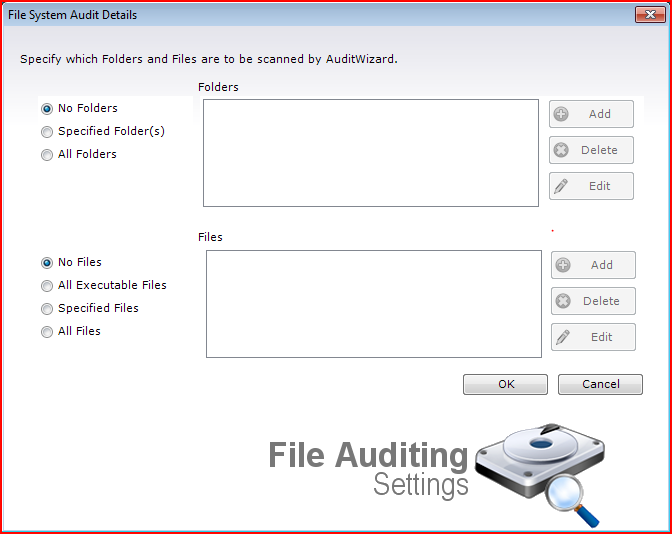
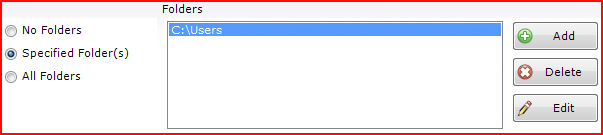
- The Folder section defines where the Scanner will look for files. To specify a specific folder or folders, click the Specified Folder(s) radio button. Click the Add button and enter a path. You can enter more than one. The paths are literal, i.e. exactly as they appear in a Windows Explorer address field. Wildcards are not supported. Note that in specifying a folder, any subfolders will also be searched, so, for example, to look for all the .pst files, choose C:\Users.
You can also specify All Folders, but this will increase the time it takes to run an audit. - The Files section lists the files you want to audit. All Executable Files will return any executable file, regardless of name. The files in Specified Files can be specific, such as game.exe or a wildcard can be used, such as *.pst. All Files will return every file and will take a long time.
It's important to note the relationship between the settings in Folders and Files. If you specify a folder or folders but don't specify files, you won't get any results. Similarly, if you configure files to audit and don't specify a folder, then you won't get results. The File System feature looks for the specified files in the specified folders. Note that you may sometimes not get results because those files weren't in that folder, though they may still be on the computer.
Windows Registry
You can specify registry keys to be audited.
- Check the Windows Registry checkbox and click the Configure button to open the Audit Registry Keys dialog.
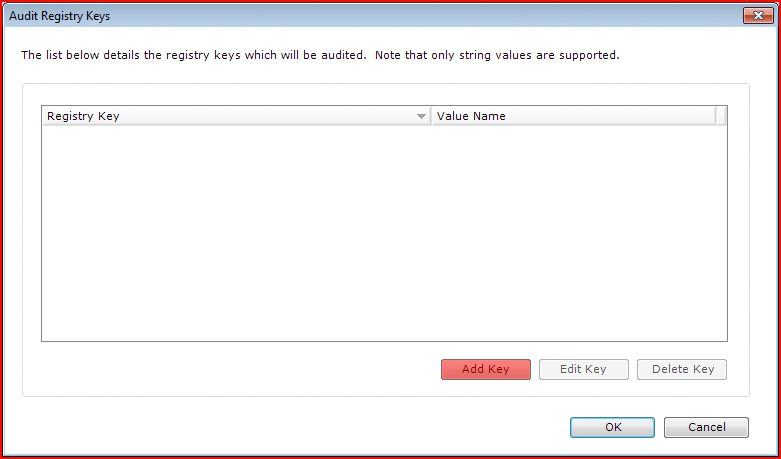
- Click the Add Key button to open the Enter Registry Key dialog. Enter a Registry Key Name and Value Name, or click the Browse Registry button
 to open a dialog to browse to the desired key.
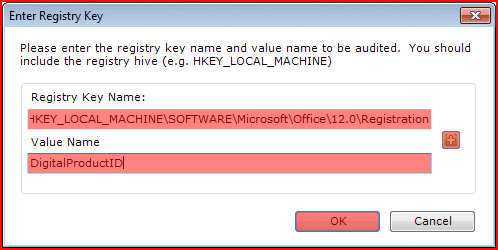
- Click the OK button to save the Registry key. It will appear in the Enter Registry Key dialog.
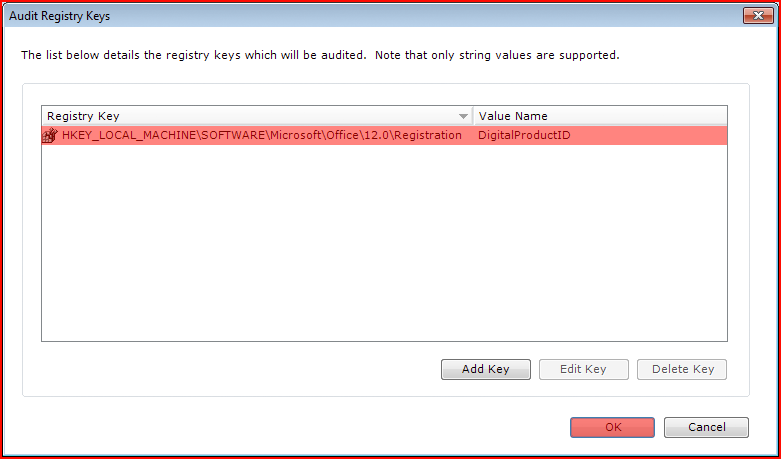
- Click the OK button to close the Enter Registry Key dialog.
Mobile Devices
Audit mobile devices such as phones and PDAs and the files on them. Manage these by clicking the Configure button.
USB Devices
To audiit the presence of USB devices such as flash drives and cameras that appear as storage volumes, check the USB Devices checkbox.
Additionally, the files contained on USB devices can be audited. Click the Configure button.
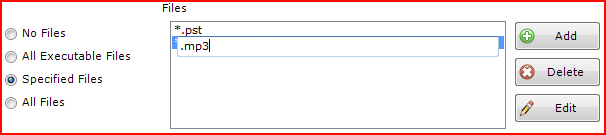
By default, the No Files radio button is selected. This will audit the presence of drives but none of the files contained on them.
To audit specific files or file types, click the Specified Files radio button and click the Add button to enter a string. Use of an asterisk * will match any character(s), so *.mp3 will audit any MP3 files, Doc*.docx will audit any .docx file beginning with Doc. Document X.docx will audit that precise file name.
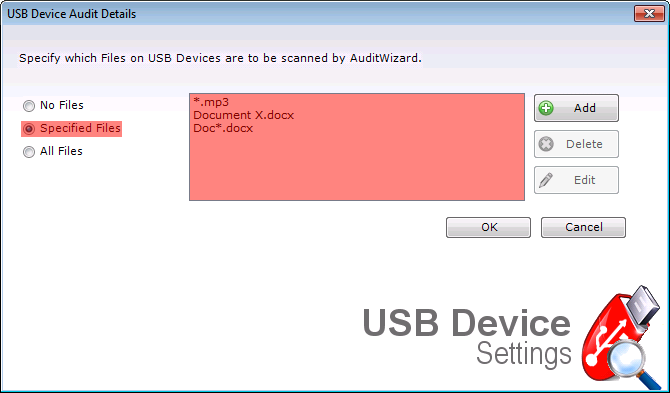
To audit all the files on USB devices, click the All Files radio button.
Click the OK button to save the settings.
Software
Audits the software on a computer.
To configure, check the Software button and click the Configure button.
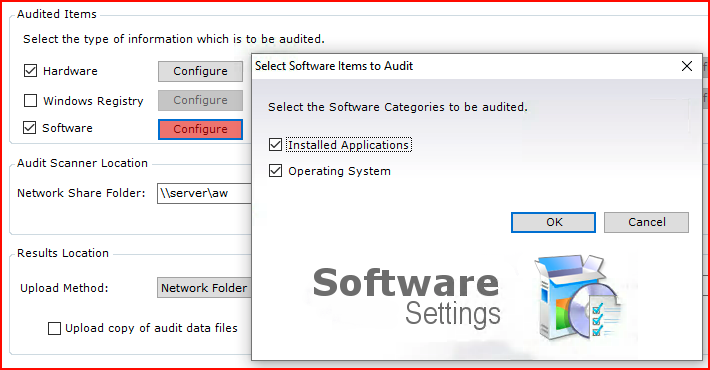
There are two options:
- Installed Applications: Any applications that are not part of the operating system
- Operating System: The operating system itself.
Audit Scanner Location

Here is where you can define where the scanner will be built to. It is recommended that this location be in UNC path notation (\\ServerName\Folder). Users will need at least Read access to this folder. Admins will need Read/Write access if they are building new scanners.
Results Location
Here is where you can specify where the audits will go once a PC has been scanned. There are 3 different methods to send the results of the audit.

Network Folder
The Data folder should be specified in UNC path notation. Users and Admins will need Full Access to the folder.
FTP Site
For off-site assets that cannot connect to the network. The audits upload to an FTP site, for later download to the server. Click Details and the following window will be displayed:
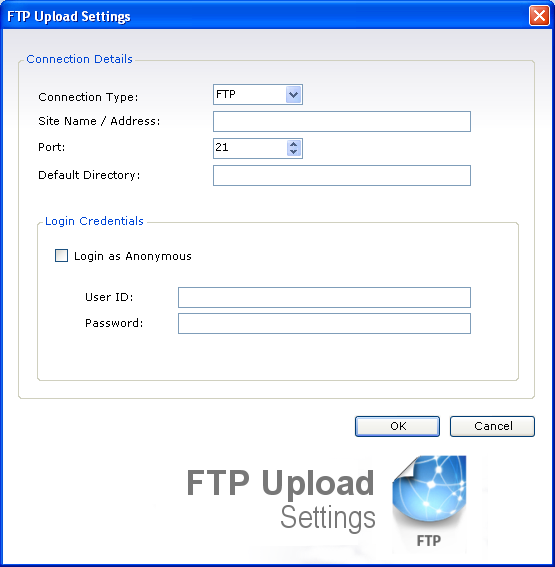
Enter the Connection Type, Address, Port, Default Directory, and Login Credentials. Click OK to save the FTP settings.
Removable Media Device
For storage on removable media, specify a folder path in the Data Folder field.
Alert Monitor Settings

This is where the basic settings are for activating AlertMonitor and configuring check intervals.
To enable AlertMonitor, check Enable AlertMonitor for this Scanner Configuration. To set specific alerts, go to AlertMonitor Configuration.
Check for Setting Changes Every: X Seconds – This setting denotes how often the Alert Monitor will check for changes on the system.
Check for Alterable Changes Every: X Seconds – This setting tells the Alert Monitor how often to send the changes it has found back to the server.
Select a predefined Alert Monitor Definition: This is where you can select a default trigger that you have setup in AlertMonitor Configuration.
Configuring the Logon Script
When you first install AuditWizard, the Setup Wizard has a step that gives you the strings to use in your logon script. This is reproduced here:
Windows Networks
Add the following line to your Windows Logon Script
Start \\SERVER\SHARE\scanner\AuditScanner.exe
Novell Networks
Add the following line to your Novell Networks Logon Script
@\\SERVER\SHARE\scanner\AuditScanner.exe
Rebuild the Scanner
Most upgrades will require the scanner to be rebuilt and redeployed in order to ensure that the latest version is in use. The Release Notes will confirm this. To rebuild the scanner:
- Go to Administration > Auditing > AuditScanner Configuration.
- Click the Save Configuration button. This saves the configuration with the name in the Scanner Name field.
- Click the Deploy to Network button. This writes the data and scanner folders to the root of the network share.