Layton ServiceDesk - Settings - Libraries - Request Statuses
m (Exploded table to new section format) |
(Completed section) |
||
| (5 intermediate revisions by one user not shown) | |||
| Line 1: | Line 1: | ||
| − | <p align="right">[[File:btn_back_up.png|link=User Guide for Layton | + | <p align="right">[[File:btn_back_up.png|link=User Guide for Layton ServiceDesk]] [[User Guide for Layton ServiceDesk|<u>Back to Contents</u>]]</p> |
| − | <p align="right">[[File:btn_back_up.png|link=Layton | + | <p align="right">[[File:btn_back_up.png|link=Layton ServiceDesk - Settings - Libraries - Request Types]] [[Layton ServiceDesk - Settings - Libraries - Request Types |<u>Previous article in this series: ''Request Types''</u>]]</p> |
=Overview= | =Overview= | ||
The ''Request Status'' identifies the stage or status of a Request. The normal stages are ''Open'' or ''Closed''; however, you can add custom statuses such as ''Suspended'', ''On Hold'', etc. | The ''Request Status'' identifies the stage or status of a Request. The normal stages are ''Open'' or ''Closed''; however, you can add custom statuses such as ''Suspended'', ''On Hold'', etc. | ||
| − | [[File: | + | [[File:Lsd lib req status 01.png|center|link=]] |
==Status State== | ==Status State== | ||
| Line 25: | Line 25: | ||
[[File:Lsd req status02.png|center|link=]] | [[File:Lsd req status02.png|center|link=]] | ||
| − | + | ===Settings=== | |
| − | + | ====Status==== | |
| − | + | A unique Request Status name. | |
| − | + | ||
| − | + | ====On Status==== | |
| − | + | Set the type of Status State. | |
| − | + | ||
| − | + | ====Allow End User==== | |
| − | + | Determines whether an End User can see the Status in the Change Status menu on the Change Status page. | |
| − | + | ||
| − | + | ====Force Status Color==== | |
| − | + | Applies the Status Color to the Request in List View. | |
| − | + | ||
| − | + | ====Status Color==== | |
| − | + | Choose a color for this status. | |
| − | + | ||
| − | + | ||
| − | + | ||
| − | + | ||
| − | + | ||
Click the Save button [[File:save.png|link=]] to save the Request Status configuration. | Click the Save button [[File:save.png|link=]] to save the Request Status configuration. | ||
| Line 53: | Line 48: | ||
[[File:Lsd req status03.png|center|link=]] | [[File:Lsd req status03.png|center|link=]] | ||
| − | + | ===Settings=== | |
| − | + | ====Close when ''Open Date''==== | |
| − | + | The date that the Request was created. | |
| − | + | ||
| − | + | ====Close when ''Current Status''==== | |
| − | + | Length of time spent in the same status that it is in currently. | |
| − | + | ||
| − | + | ====Exceeds These Days==== | |
| − | + | The number of days to apply to the ''Close when'' criterion | |
| − | + | ||
| − | + | ====Closed By User==== | |
| − | + | You can specify which Analyst you want to be assigned when a Request is automatically closed. For example, you could set this to ''admin'' rather than the assigned Analyst, because that Analyst did not close the Request. | |
| − | + | ||
| − | + | ====Solution==== | |
| − | + | Enter text to be written into the Solution tab on automatic closure. | |
| − | + | ||
| − | + | ||
| − | + | ||
| − | + | ||
| − | + | ||
==Editing a Request Status== | ==Editing a Request Status== | ||
Click the name of the Status. Make changes to the Properties. | Click the name of the Status. Make changes to the Properties. | ||
| + | |||
| + | ==Access== | ||
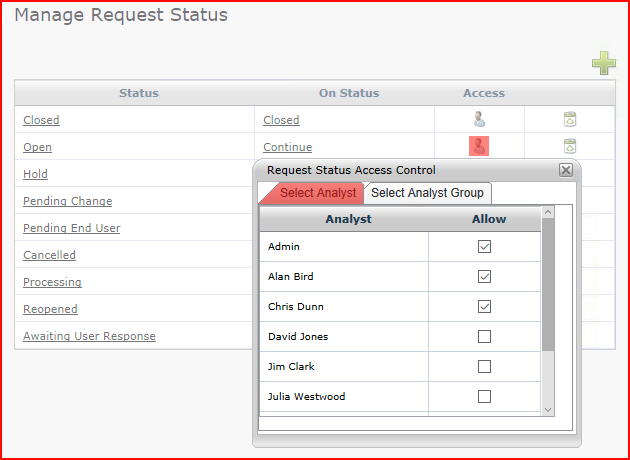
| + | On creation, a Status will be available to all Analysts and Analyst Groups. To change the access permissions, click the User Access button [[File:Lsd btn user access 16px.png|link=]] in the ''Access'' column for the Status. | ||
| + | |||
| + | ===Select Analyst=== | ||
| + | Click the checkboxes to remove access from individual Analysts. | ||
| + | |||
| + | [[File:Lsd lib req status access 01.png|center|link=]] | ||
| + | |||
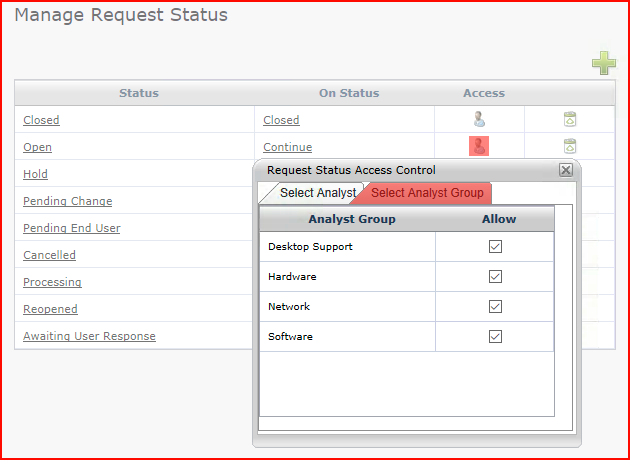
| + | ===Select Analyst Groupt=== | ||
| + | Click the checkboxes to remove access from individual Analyst Groups. | ||
| + | |||
| + | [[File:Lsd lib req status access 02.png|center|link=]] | ||
==Deleting a Request Status== | ==Deleting a Request Status== | ||
| Line 85: | Line 88: | ||
Once a Request is recorded you can change the Request Status by using the Change Status button [[File:Button change status 16.png|link=]] on any of the Request List Views or from the Change Status button [[File:Changestatusinreq.png|link=]] on the request form. | Once a Request is recorded you can change the Request Status by using the Change Status button [[File:Button change status 16.png|link=]] on any of the Request List Views or from the Change Status button [[File:Changestatusinreq.png|link=]] on the request form. | ||
| − | <p align="right">[[Layton | + | <p align="right">[[Layton ServiceDesk - Settings - Libraries - Request Templates |<u>Next article in this series: ''Request Templates''</u>]] [[File:Btn forward.png|link=Layton ServiceDesk - Settings - Libraries - Request Templates]]</p> |
| − | <p align="right">[[File:btn_back_up.png|link=User Guide for Layton | + | <p align="right">[[File:btn_back_up.png|link=User Guide for Layton ServiceDesk]] [[User Guide for Layton ServiceDesk|<u>Back to Contents</u>]]</p> |
Latest revision as of 03:59, 6 February 2017
![]() Previous article in this series: Request Types
Previous article in this series: Request Types
Contents |
[edit] Overview
The Request Status identifies the stage or status of a Request. The normal stages are Open or Closed; however, you can add custom statuses such as Suspended, On Hold, etc.
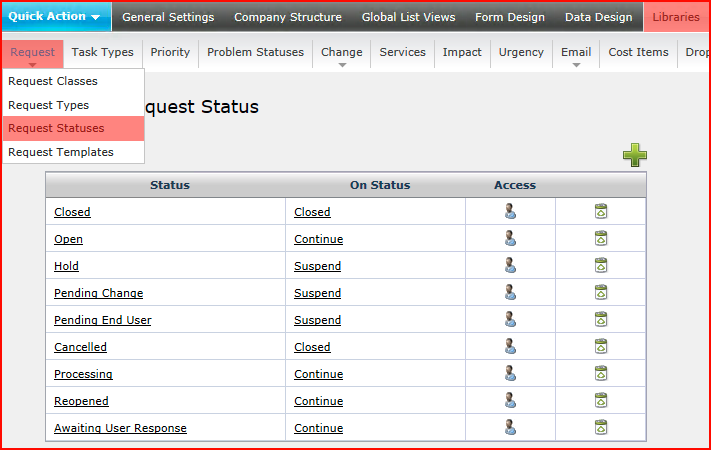
[edit] Status State
While the names can be custom and any number can be configured, Statuses refer to three underlying states, referred to as On Status in settings:
[edit] Continue
A Status that is in progress. Open is a Continue Status. The clock is running.
[edit] Suspend
A Status that is not closed but the clock has been stopped. Time elapsed within a Suspend Status will not affect an SLA.
[edit] Closed
A Status that indicates that a Request has been completed. The clock is stopped.
[edit] Procedure
[edit] New Request Status
To add a new Request Status, click the Add button ![]() . The Properties dialog will open:
. The Properties dialog will open:
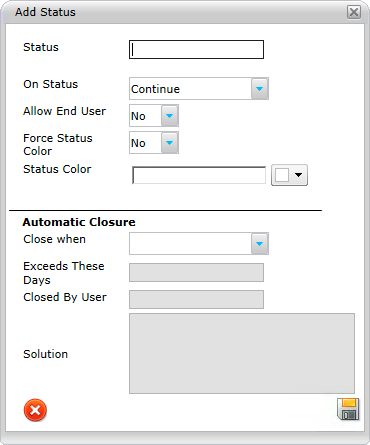
[edit] Settings
[edit] Status
A unique Request Status name.
[edit] On Status
Set the type of Status State.
[edit] Allow End User
Determines whether an End User can see the Status in the Change Status menu on the Change Status page.
[edit] Force Status Color
Applies the Status Color to the Request in List View.
[edit] Status Color
Choose a color for this status.
Click the Save button ![]() to save the Request Status configuration.
to save the Request Status configuration.
[edit] Automatic Closure Option
This feature can be used to close a Request after a time period elapses. These options are greyed out unless Open Date or Current Status are selected in the Close when menu. The option does not need to be enabled.
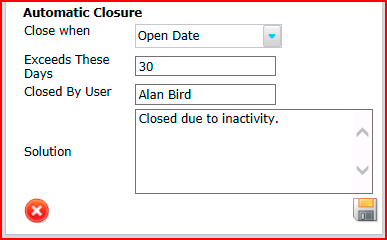
[edit] Settings
[edit] Close when Open Date
The date that the Request was created.
[edit] Close when Current Status
Length of time spent in the same status that it is in currently.
[edit] Exceeds These Days
The number of days to apply to the Close when criterion
[edit] Closed By User
You can specify which Analyst you want to be assigned when a Request is automatically closed. For example, you could set this to admin rather than the assigned Analyst, because that Analyst did not close the Request.
[edit] Solution
Enter text to be written into the Solution tab on automatic closure.
[edit] Editing a Request Status
Click the name of the Status. Make changes to the Properties.
[edit] Access
On creation, a Status will be available to all Analysts and Analyst Groups. To change the access permissions, click the User Access button ![]() in the Access column for the Status.
in the Access column for the Status.
[edit] Select Analyst
Click the checkboxes to remove access from individual Analysts.
[edit] Select Analyst Groupt
Click the checkboxes to remove access from individual Analyst Groups.
[edit] Deleting a Request Status
To delete a status, click the Delete button ![]() on the Manage Request Status page. Note: You cannot delete the Closed Status.
on the Manage Request Status page. Note: You cannot delete the Closed Status.
[edit] Using Request Statuses
The default Status for all Requests is set to Open but can be changed in Default Status.
Once a Request is recorded you can change the Request Status by using the Change Status button ![]() on any of the Request List Views or from the Change Status button
on any of the Request List Views or from the Change Status button ![]() on the request form.
on the request form.