Layton ServiceDesk - Pre-Installation - ASP.NET Configuration
From Layton Support
(Difference between revisions)
m |
(Added "Back to Special Notes" link) |
||
| Line 1: | Line 1: | ||
| − | <p align="right">[[File:btn_back_up.png|link=Layton ServiceDesk™ - Installation - Special Notes]] [[Layton ServiceDesk™ - Installation - Special Notes|<u>Back</u>]]</p> | + | <p align="right">[[File:btn_back_up.png|link=Layton ServiceDesk™ - Installation - Special Notes]] [[Layton ServiceDesk™ - Installation - Special Notes|<u>Back to Special Notes</u>]]</p> |
__FORCETOC__ | __FORCETOC__ | ||
==IIS 5 (Windows XP)== | ==IIS 5 (Windows XP)== | ||
| Line 9: | Line 9: | ||
<li>Click the OK button. Restart the IIS service and close the IIS Manager.</li> | <li>Click the OK button. Restart the IIS service and close the IIS Manager.</li> | ||
</ol> | </ol> | ||
| − | <p align="right">[[File:btn_back_up.png|link=Layton ServiceDesk™ - Installation - Special Notes]] [[Layton ServiceDesk™ - Installation - Special Notes|<u>Back</u>]]</p> | + | <p align="right">[[File:btn_back_up.png|link=Layton ServiceDesk™ - Installation - Special Notes]] [[Layton ServiceDesk™ - Installation - Special Notes|<u>Back to Special Notes</u>]]</p> |
| − | + | ||
==IIS 6 (Windows Server 2003)== | ==IIS 6 (Windows Server 2003)== | ||
<ol> | <ol> | ||
| Line 19: | Line 18: | ||
<li>Click the OK button. Restart the IIS service and close the IIS Manager.</li> | <li>Click the OK button. Restart the IIS service and close the IIS Manager.</li> | ||
</ol> | </ol> | ||
| − | <p align="right">[[File:btn_back_up.png|link=Layton ServiceDesk™ - Installation - Special Notes]] [[Layton ServiceDesk™ - Installation - Special Notes|<u>Back</u>]]</p> | + | <p align="right">[[File:btn_back_up.png|link=Layton ServiceDesk™ - Installation - Special Notes]] [[Layton ServiceDesk™ - Installation - Special Notes|<u>Back to Special Notes</u>]]</p>==IIS 7 (Windows 7/Server 2008)== |
| − | + | ||
| − | ==IIS 7 (Windows 7/Server 2008)== | + | |
<ol> | <ol> | ||
<li>Launch Internet Information Services (IIS) Manager.</li> | <li>Launch Internet Information Services (IIS) Manager.</li> | ||
| Line 29: | Line 26: | ||
<li>Click the OK button. Restart the IIS service and close the IIS Manager.</li> | <li>Click the OK button. Restart the IIS service and close the IIS Manager.</li> | ||
</ol> | </ol> | ||
| − | <p align="right">[[File:btn_back_up.png|link=Layton ServiceDesk™ - Installation - Special Notes]] [[Layton ServiceDesk™ - Installation - Special Notes|<u>Back</u>]]</p> | + | <p align="right">[[File:btn_back_up.png|link=Layton ServiceDesk™ - Installation - Special Notes]] [[Layton ServiceDesk™ - Installation - Special Notes|<u>Back to Special Notes</u>]]</p> |
Revision as of 04:34, 21 October 2010
Contents |
IIS 5 (Windows XP)
- Launch Internet Information Services (IIS) Manager.
- Expand Server > Web Sites > Default Web Site. Right-click LaytonServiceDesk and select Properties. Click the ASP.NET tab:
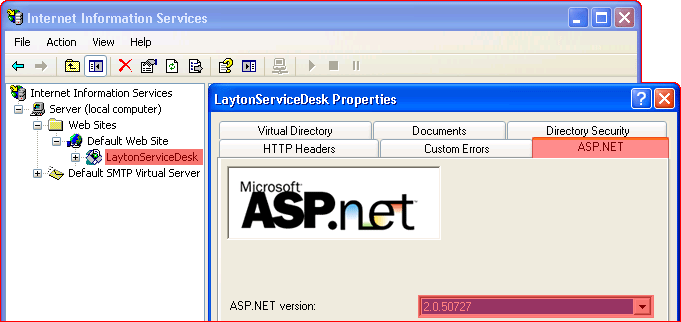
- Set the ASP.NET version to 2.0.50727.
- Click the OK button. Restart the IIS service and close the IIS Manager.

IIS 6 (Windows Server 2003)
- Launch Internet Information Services (IIS) Manager.
- Expand Server > Web Sites > Default Web Site. Right-click LaytonServiceDesk and select Properties. Click the ASP.NET tab:
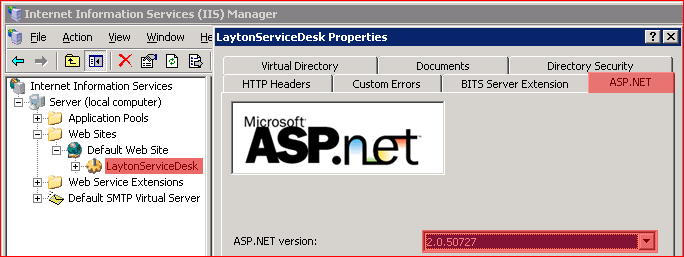
- Set the ASP.NET version to 2.0.50727.
- Click the OK button. Restart the IIS service and close the IIS Manager.

- Launch Internet Information Services (IIS) Manager.
- Click Application Pools in the left-hand pane. Click DefaultAppPool in the middle pane. Click Basic Settings... in the right-hand pane:
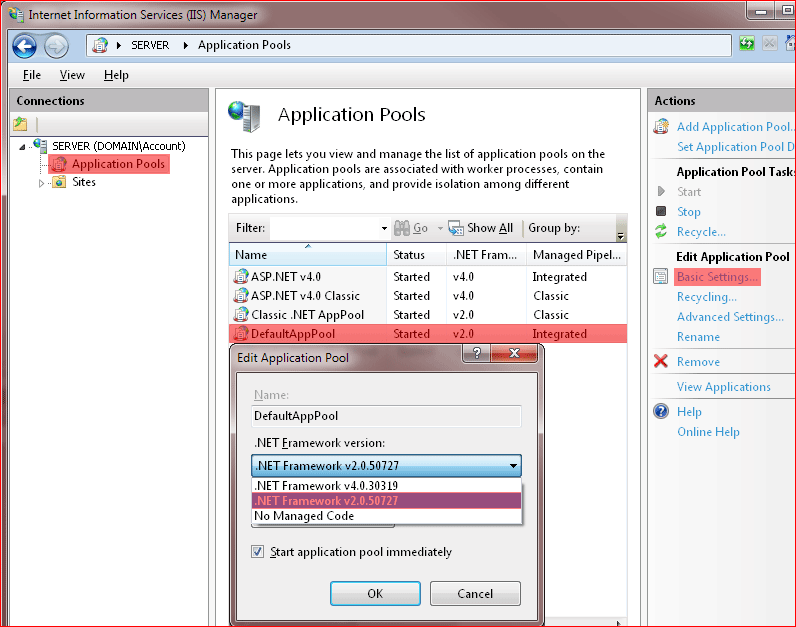
- Set the ASP.NET version to 2.0.50727.
- Click the OK button. Restart the IIS service and close the IIS Manager.
