Layton ServiceDesk - Using Layton ServiceDesk (End User) - Lodging a New Request Via the Web Interface
(Completed section) |
|||
| (12 intermediate revisions by 2 users not shown) | |||
| Line 1: | Line 1: | ||
| − | = | + | <p align="right">[[File:btn_back_up.png|link=User Guide for Layton ServiceDesk]] [[User Guide for Layton ServiceDesk|<u>Back to Contents</u>]]</p> |
| − | [[File: | + | =Overview= |
| − | + | New Requests are created or logged by End Users using '''Log New Request'''. The End User Request form is displayed allowing Request details to be entered as previously defined by the Administrator using '''Administration | Form Design | End User Request'''. | |
| − | + | The amount and type of information to be entered by End Users is completely configurable. This can be a limited view allowing basic or just enough information to record a Request, or the same format as for Analysts providing full End User empowerment. The latter would enable End Users to log, maybe prioritize, search the Solutions Base and even close their own Requests. | |
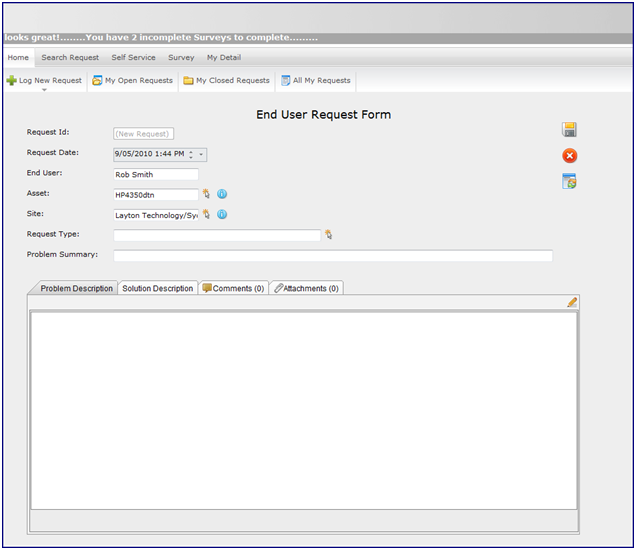
| − | + | Although the End User Request form is configurable, certain system fields will normally be required. The example in Figure 48 shows the standard out of the box End User Request form. | |
| − | + | [[File:Fig48.png|center|frame|link=]] | |
| − | + | ||
| − | + | ||
| − | + | ||
| + | =The Approach= | ||
| + | ==Choosing a Request Class== | ||
| + | Commonly, an End User would choose a Request Class with an obvious name, like ''IT'', ''HR'', etc., and the appropriate form would be presented. If the End User is '''[[Layton ServiceDesk - Settings - Company Structure - Manage End User#Request Class|assigned to specific Request Classes]]''' and ''Restrict End User Request Classes'' is enabled in '''[[Layton ServiceDesk - General Settings - Security|General Settings > Security > Global End User Security]]''', they will only see the Request Classes assigned to them. | ||
| − | + | ==Guidance through the Dynamic Form Generator== | |
| − | [[ | + | If the '''[[Layton ServiceDesk - Settings - Libraries - Request Classes#Dynamic Form Generator|Dynamic Form Generator]]''' option is enabled in Administration > Libraries > Request Classes, the End User can instead be presented with a simplified form in which they select a Request Type and the appropriate Request Class form is presented. |
| − | + | ||
| − | ''' | + | |
| − | + | ||
| + | =The Form= | ||
| + | ==Request ID== | ||
| + | A new Request ID number is automatically generated, sequentially starting from one, when a request is created. Until a new request is saved the Request ID field will be displayed as (New Request). Once the new Request is saved the Request ID number will be displayed. | ||
| − | == | + | ==Request Date== |
| + | Automatically populated with the date and time that the Request was created. The date and time can be amended if the security setting is enabled in '''Administration | General Settings | Security | General Security | Allow Request Date Edit By'''. | ||
| − | + | ==End User== | |
| + | The End User name will be automatically populated with those of the End User logging the Request. | ||
| − | + | ==Asset== | |
| + | An Asset can be a PC or any item that is support and can be entered as free format text or left blank. | ||
| − | + | If the AuditWizard link is implemented then the Asset can be entered or searched for by using the Select Asset icon. The Find Asset screen will pop up allowing you to enter search criteria based on Asset Name, IP Address, Asset Tag, User Name or Site. When the search results are returned you can select the required Asset or perform another search. | |
| + | If the setting “AW Get Last Asset” is turned ON in '''Administration | System Settings | AuditWizard | AW Get Last Asset''', then when the End User logs a new Request it will automatically populate the Asset field with the last Asset that they logged a call against. | ||
| − | + | If the setting “End User View Asset” is turned ON in '''Administration | System Settings | AuditWizard | End User View Asset''', then once the asset has been selected the End User can click Quick Info on Asset icon next to the Asset field which will display all the Asset inventory information. | |
| − | + | ||
| − | + | ||
| − | ''' | + | |
| − | + | ||
| + | ==Asset Location== | ||
| + | The Asset location will be automatically populated if the asset has been selected from the AuditWizard database and the “Auto Location” option is turned on in '''Administration | System Settings | AuditWizard | Auto Location'''. | ||
| − | + | The Location can also be input directly or by using the Select Asset Location button. | |
| − | + | ||
| − | + | ||
| − | + | ||
| − | + | ||
| + | ==Request Type== | ||
| + | The Request Type can be selected from the predefined structure by using the Select Request Type button. Any level in the tree structure can be selected. | ||
| − | '''Note''' | + | ==Problem Summary== |
| + | This is a summary of the End User’s request or problem. If the End User logs a request by email then the email Subject line will populate this field. | ||
| + | |||
| + | ==Problem Description== | ||
| + | This is a full description of the request or problem, and any amount of text can be entered. If the End User logs a request by email then the email body will populate this field. | ||
| + | |||
| + | ==Solution Description== | ||
| + | This is a full description of the Solution and will be completed by the Analyst prior to closing the Request. | ||
| + | |||
| + | ==Other End User Fields== | ||
| + | Any other system or data fields may need to be completed depending on what has been defined on the End User Request form. See section LOGGING A NEW REQUEST (ANALYST) for examples on additional fields. | ||
| + | |||
| + | =Buttons= | ||
| + | There are three buttons available on the End User request forms which have the following functions: | ||
| + | |||
| + | ==Change Status [[File:Changestatusinreq.png|link=]]== | ||
| + | The Change Status icon will allow the End User to close the request or change the status of the Request to another Status, provided that the End Users have been given permission to do so. The ability for End User to be able to close their own requests is a global security setting in '''Administration | General Settings | Security | Global End User Security | Allow End User to Close Requests'''. | ||
| + | |||
| + | To give End Users the ability to select other Request Statuses go to '''Administration | Libraries | Request Statuses'''. Select the Request Status and turn the “Allow End User” option to Yes. | ||
| + | |||
| + | ==Cancel [[File:Lsd btn cancel 24px.png|link=]]== | ||
| + | If you had selected log new request and you click the Cancel button before clicking the Save button this will return you to the Home page without creating a new request. If an existing request was being edited the changes will not be saved and you will be returned to the Home page. | ||
| + | |||
| + | ==Save [[File:Save.png|link=]]== | ||
| + | A new Request will be created or if changes were made to an existing request the changes will be saved and you will be returned to the Home page. | ||
| + | |||
| + | '''Note: The “Save” option MUST be selected when logging a new request otherwise the Request details will not be saved and the Request will not be created.''' | ||
| + | |||
| + | =Tabs= | ||
| + | ==Attachments== | ||
| + | Attachments provide the ability to upload files, screenshots or any other documentation that may be relevant to the request. It also allows the End Users to download any files that may have been added to the Request by the Analysts. | ||
| + | |||
| + | To upload a file click on the Attachment icon and then a list of any existing attachments will be displayed. To download an existing attachment simply click on the link. To upload a new attachment click on the add icon and then a pop up dialog window will appear which allows the End User to browse to the file location. Once the file has been selected click the Save button and this will upload the attachment. | ||
| + | |||
| + | If End user Attachments are not required the icon can be disabled by going to '''Administration | General Settings | Security | Global End User Security | End User Attachments'''. | ||
| + | |||
| + | ==Comments== | ||
| + | Comments allow the End Users and Analysts to add notes to the Request which are then recorded with a date stamp and the author details. The Comments feature is a great way for the Analysts and End Users to communicate with one another. When an End User adds a comment this will email the details of the Comment to the Analyst that has been assigned the request and if an Analyst adds a Public Comment this will email the details of the Comment to the End User. | ||
| + | |||
| + | If an End User or Analyst replies to a Comment that they have received via email their reply can be automatically added as a Comment to the Request. To turn on the automatic processing of emailed Comments go to '''Administration | System Settings | Email Server Settings | Auto Import Email Comments'''. If this option is turned Off the emailed Comments will appear in the Email Pending queue where they can be viewed and manually converted into a Comment. | ||
| + | For more information about configuring the Email Notifications please see Email Server Settings. | ||
| + | |||
| + | =Viewing and Editing Requests= | ||
| + | |||
| + | When entering the system as an End User there are various options or Menu items to display Request List Views so you can edit and progress Requests. All Request views display the same information and so the following Menu items can be described together: | ||
| + | |||
| + | {| class="wikitable" border="0" | ||
| + | |- | ||
| + | ! style="background:#009999; width: 150px; color: #FFFFFF"|View | ||
| + | ! style="background:#009999; width: 850px; color: #FFFFFF"|Description | ||
| + | |- | ||
| + | |My Open Requests | ||
| + | |Requests logged by the End User which are still open. | ||
| + | |- | ||
| + | |My Closed Requests | ||
| + | |Requests logged by the End User which are closed. | ||
| + | |- | ||
| + | |All My Requests | ||
| + | |All End User Requests whether open or closed. | ||
| + | |- | ||
| + | |} | ||
| + | |||
| + | If required, any of these menu items can be disabled by going to '''[[Layton ServiceDesk - General Settings - Security#Global_End_User_Security|Administration > General Settings > Security > Global End User Security]]'''. | ||
| + | |||
| + | By selecting the column headings, the list view can be sorted by ascending sequence on that column and by selecting again, the order changed to descending. | ||
| + | |||
| + | The Tasks icon identifies whether any tasks or actions exist for a Request and by Selecting the Task icon, the list of Tasks associated with that Request will be displayed. The Task icon will have a tick displayed if there are Tasks present for that Request and on positioning over the icon, the number of Tasks will be displayed. | ||
| + | |||
| + | The Comments Icon identifies whether any Comments exist for the Request. If there are any Comments a tick will be displayed and hovering above the icon will display the number of Comments. If an Analyst has added a Comment to the Request that the End User has not yet viewed there will be a red exclamation mark on the icon indicating to the End User that there is an unread Comment on the Request. Click the Comments icon will show the comments listed and the Comment details can be viewed by clicking the expand icon. | ||
| + | |||
| + | The Status icon shows whether the Request is open or closed although as mentioned above other open Request Statuses can be defined, see Request Statuses. By selecting the Status icon the status of the Request can be changed, providing the End User option has been set accordingly. | ||
| + | |||
| + | In any of the above views the Request can be selected to view or amend, if allowed, by selecting any data field for a particular Request, e.g. the Request ID, Date, etc. The End User Request form will be displayed showing all the Request details. | ||
| + | |||
| + | See the section '''[[Layton ServiceDesk - Using Layton ServiceDesk (End User) - Lodging a New Request Via the Web Interface#The_Form|The Form]]''' above for details on individual fields. | ||
| + | <p align="right">[[File:btn_back_up.png|link=User Guide for Layton ServiceDesk]] [[User Guide for Layton ServiceDesk|<u>Back to Contents</u>]]</p> | ||
Latest revision as of 06:02, 18 July 2018
Contents |
[edit] Overview
New Requests are created or logged by End Users using Log New Request. The End User Request form is displayed allowing Request details to be entered as previously defined by the Administrator using Administration | Form Design | End User Request.
The amount and type of information to be entered by End Users is completely configurable. This can be a limited view allowing basic or just enough information to record a Request, or the same format as for Analysts providing full End User empowerment. The latter would enable End Users to log, maybe prioritize, search the Solutions Base and even close their own Requests.
Although the End User Request form is configurable, certain system fields will normally be required. The example in Figure 48 shows the standard out of the box End User Request form.
[edit] The Approach
[edit] Choosing a Request Class
Commonly, an End User would choose a Request Class with an obvious name, like IT, HR, etc., and the appropriate form would be presented. If the End User is assigned to specific Request Classes and Restrict End User Request Classes is enabled in General Settings > Security > Global End User Security, they will only see the Request Classes assigned to them.
[edit] Guidance through the Dynamic Form Generator
If the Dynamic Form Generator option is enabled in Administration > Libraries > Request Classes, the End User can instead be presented with a simplified form in which they select a Request Type and the appropriate Request Class form is presented.
[edit] The Form
[edit] Request ID
A new Request ID number is automatically generated, sequentially starting from one, when a request is created. Until a new request is saved the Request ID field will be displayed as (New Request). Once the new Request is saved the Request ID number will be displayed.
[edit] Request Date
Automatically populated with the date and time that the Request was created. The date and time can be amended if the security setting is enabled in Administration | General Settings | Security | General Security | Allow Request Date Edit By.
[edit] End User
The End User name will be automatically populated with those of the End User logging the Request.
[edit] Asset
An Asset can be a PC or any item that is support and can be entered as free format text or left blank.
If the AuditWizard link is implemented then the Asset can be entered or searched for by using the Select Asset icon. The Find Asset screen will pop up allowing you to enter search criteria based on Asset Name, IP Address, Asset Tag, User Name or Site. When the search results are returned you can select the required Asset or perform another search.
If the setting “AW Get Last Asset” is turned ON in Administration | System Settings | AuditWizard | AW Get Last Asset, then when the End User logs a new Request it will automatically populate the Asset field with the last Asset that they logged a call against.
If the setting “End User View Asset” is turned ON in Administration | System Settings | AuditWizard | End User View Asset, then once the asset has been selected the End User can click Quick Info on Asset icon next to the Asset field which will display all the Asset inventory information.
[edit] Asset Location
The Asset location will be automatically populated if the asset has been selected from the AuditWizard database and the “Auto Location” option is turned on in Administration | System Settings | AuditWizard | Auto Location.
The Location can also be input directly or by using the Select Asset Location button.
[edit] Request Type
The Request Type can be selected from the predefined structure by using the Select Request Type button. Any level in the tree structure can be selected.
[edit] Problem Summary
This is a summary of the End User’s request or problem. If the End User logs a request by email then the email Subject line will populate this field.
[edit] Problem Description
This is a full description of the request or problem, and any amount of text can be entered. If the End User logs a request by email then the email body will populate this field.
[edit] Solution Description
This is a full description of the Solution and will be completed by the Analyst prior to closing the Request.
[edit] Other End User Fields
Any other system or data fields may need to be completed depending on what has been defined on the End User Request form. See section LOGGING A NEW REQUEST (ANALYST) for examples on additional fields.
[edit] Buttons
There are three buttons available on the End User request forms which have the following functions:
[edit] Change Status 
The Change Status icon will allow the End User to close the request or change the status of the Request to another Status, provided that the End Users have been given permission to do so. The ability for End User to be able to close their own requests is a global security setting in Administration | General Settings | Security | Global End User Security | Allow End User to Close Requests.
To give End Users the ability to select other Request Statuses go to Administration | Libraries | Request Statuses. Select the Request Status and turn the “Allow End User” option to Yes.
[edit] Cancel 
If you had selected log new request and you click the Cancel button before clicking the Save button this will return you to the Home page without creating a new request. If an existing request was being edited the changes will not be saved and you will be returned to the Home page.
[edit] Save 
A new Request will be created or if changes were made to an existing request the changes will be saved and you will be returned to the Home page.
Note: The “Save” option MUST be selected when logging a new request otherwise the Request details will not be saved and the Request will not be created.
[edit] Tabs
[edit] Attachments
Attachments provide the ability to upload files, screenshots or any other documentation that may be relevant to the request. It also allows the End Users to download any files that may have been added to the Request by the Analysts.
To upload a file click on the Attachment icon and then a list of any existing attachments will be displayed. To download an existing attachment simply click on the link. To upload a new attachment click on the add icon and then a pop up dialog window will appear which allows the End User to browse to the file location. Once the file has been selected click the Save button and this will upload the attachment.
If End user Attachments are not required the icon can be disabled by going to Administration | General Settings | Security | Global End User Security | End User Attachments.
[edit] Comments
Comments allow the End Users and Analysts to add notes to the Request which are then recorded with a date stamp and the author details. The Comments feature is a great way for the Analysts and End Users to communicate with one another. When an End User adds a comment this will email the details of the Comment to the Analyst that has been assigned the request and if an Analyst adds a Public Comment this will email the details of the Comment to the End User.
If an End User or Analyst replies to a Comment that they have received via email their reply can be automatically added as a Comment to the Request. To turn on the automatic processing of emailed Comments go to Administration | System Settings | Email Server Settings | Auto Import Email Comments. If this option is turned Off the emailed Comments will appear in the Email Pending queue where they can be viewed and manually converted into a Comment. For more information about configuring the Email Notifications please see Email Server Settings.
[edit] Viewing and Editing Requests
When entering the system as an End User there are various options or Menu items to display Request List Views so you can edit and progress Requests. All Request views display the same information and so the following Menu items can be described together:
| View | Description |
|---|---|
| My Open Requests | Requests logged by the End User which are still open. |
| My Closed Requests | Requests logged by the End User which are closed. |
| All My Requests | All End User Requests whether open or closed. |
If required, any of these menu items can be disabled by going to Administration > General Settings > Security > Global End User Security.
By selecting the column headings, the list view can be sorted by ascending sequence on that column and by selecting again, the order changed to descending.
The Tasks icon identifies whether any tasks or actions exist for a Request and by Selecting the Task icon, the list of Tasks associated with that Request will be displayed. The Task icon will have a tick displayed if there are Tasks present for that Request and on positioning over the icon, the number of Tasks will be displayed.
The Comments Icon identifies whether any Comments exist for the Request. If there are any Comments a tick will be displayed and hovering above the icon will display the number of Comments. If an Analyst has added a Comment to the Request that the End User has not yet viewed there will be a red exclamation mark on the icon indicating to the End User that there is an unread Comment on the Request. Click the Comments icon will show the comments listed and the Comment details can be viewed by clicking the expand icon.
The Status icon shows whether the Request is open or closed although as mentioned above other open Request Statuses can be defined, see Request Statuses. By selecting the Status icon the status of the Request can be changed, providing the End User option has been set accordingly.
In any of the above views the Request can be selected to view or amend, if allowed, by selecting any data field for a particular Request, e.g. the Request ID, Date, etc. The End User Request form will be displayed showing all the Request details.
See the section The Form above for details on individual fields.