Layton ServiceDesk - Settings - Libraries - Priority
m (Replaced image) |
m (Minor text changes) |
||
| (20 intermediate revisions by one user not shown) | |||
| Line 1: | Line 1: | ||
| − | <p align="right">[[File:btn_back_up.png|link=User Guide for Layton | + | <p align="right">[[File:btn_back_up.png|link=User Guide for Layton ServiceDesk]] [[User Guide for Layton ServiceDesk|<u>Back to Contents</u>]]</p> |
| − | <p align="right">[[File:btn_back_up.png|link=Layton | + | <p align="right">[[File:btn_back_up.png|link=Layton ServiceDesk - Settings - Libraries - Task Types]] [[Layton ServiceDesk - Settings - Libraries - Task Types|<U>Previous article in this series: ''Task Types''</u>]]</p> |
=Overview= | =Overview= | ||
''Priorities'' dictate the importance of Requests and escalation times and routes. They are user configurable and are defined within a Priority, and although Priorities as such may not be required, in order to set any Priority, an Priority name or title is defined. | ''Priorities'' dictate the importance of Requests and escalation times and routes. They are user configurable and are defined within a Priority, and although Priorities as such may not be required, in order to set any Priority, an Priority name or title is defined. | ||
| Line 12: | Line 12: | ||
[[File:Lsd priority01.png|center|link=]] | [[File:Lsd priority01.png|center|link=]] | ||
| + | |||
| + | ==Setting Priority Order== | ||
| + | Priorities can be set to an arbitrary sort order for display in the Priority menu on the Request form. Click the Up [[File:Lsd btn priority up 24px.png|link=]] and Down [[File:Lsd btn priority down 24px.png|link=]] buttons in the ''Order'' column to set the desired order. | ||
=Configuring the Priority= | =Configuring the Priority= | ||
| − | + | ==Deciding on Priority Configuration Options== | |
| − | + | Priorities can be configured as simple descriptions for a generalised priority, or they can be additionally configured with times that define escalation and expiry. Decide on how complex your needs are with the below table. | |
| − | + | ||
| − | + | ||
| − | + | ||
| − | + | ||
| − | + | ||
| − | + | Escalation and resolution times take into account the '''[[Layton ServiceDesk - General Settings - Default Working Hours|Default Working Hours]]'''. | |
| − | |||
{| class="wikitable" border="1" | {| class="wikitable" border="1" | ||
|- | |- | ||
| Line 43: | Line 40: | ||
|- | |- | ||
|} | |} | ||
| − | |||
| − | == | + | ==Settings Page== |
| − | + | [[File:Lsd priority02.png|center|link=]] | |
| − | =Manual Setting= | + | ===Basic Settings=== |
| + | ====Name==== | ||
| + | This is a name that will be a unique ID to represent this Priority. | ||
| + | |||
| + | ====Description==== | ||
| + | Enter a description for the SLA that the priority represents. | ||
| + | |||
| + | ====Allow Escalation Edit==== | ||
| + | If set to ''Yes'', resolution and escalation times can be manually adjusted when saving the Request. | ||
| + | |||
| + | ===Response Time=== | ||
| + | The Analyst must respond within this number of hours. A ''response'' is defined as one of these actions, performed by the Analyst: | ||
| + | |||
| + | *Adding a new '''[[Layton ServiceDesk - Viewing and Editing Requests#Adding a Comment|Comment]]''' | ||
| + | *Applying a '''[[Layton ServiceDesk - Configuring the System - Solution Base|Solution]]''' | ||
| + | *'''[[Layton ServiceDesk - Logging a New Request Using the Web Interface#Change Request Status|Changing Request Status]]'''. | ||
| + | |||
| + | ====Expiry in==== | ||
| + | The time from creation when the Request should be responded to. A response acknowledges the End User that the Request has been received and logged. | ||
| + | |||
| + | ====Email to==== | ||
| + | Specify an Analyst to be notified if no response has been recorded within the ''Expiry in'' value. | ||
| + | |||
| + | ====Escalate to==== | ||
| + | Specify an Analyst to whom the Request should be assigned if no response has been recorded within the ''Expiry in'' value. | ||
| + | |||
| + | ===Escalation Levels=== | ||
| + | There are three levels of escalation before the resolution time expires. | ||
| + | |||
| + | ====Escalation Level 1==== | ||
| + | =====Expiry in===== | ||
| + | The time from creation when the Request will be escalated. | ||
| + | |||
| + | =====Email to===== | ||
| + | Enter the email address of a user to send an email notification to alert them that an escalation point has been reached. | ||
| + | |||
| + | =====Escalate to===== | ||
| + | Specify an Analyst to whom the Request should be assigned when the escalation time reaches Level 1. | ||
| + | |||
| + | ====Escalation Level 2==== | ||
| + | =====Expiry in===== | ||
| + | The time from creation when the Request will be escalated. This time is greater than that of Level 1. | ||
| + | |||
| + | =====Email to===== | ||
| + | Enter the email address of a user to send an email notification to alert them that an escalation point has been reached. | ||
| + | |||
| + | =====Escalate to===== | ||
| + | Specify an Analyst to whom the Request should be assigned when the escalation time reaches Level 2. | ||
| + | |||
| + | ====Escalation Level 3==== | ||
| + | =====Expiry in===== | ||
| + | The time from creation when the Request will be escalated. This time is greater than that of Level 2. | ||
| + | |||
| + | =====Email to===== | ||
| + | Enter the email address of a user to send an email notification to alert them that an escalation point has been reached. | ||
| + | |||
| + | =====Escalate to===== | ||
| + | Specify an Analyst to whom the Request should be assigned when the escalation time reaches Level 3. | ||
| + | |||
| + | ===Missed Resolve Time=== | ||
| + | ====Expiry in==== | ||
| + | The time from creation when the Request will be considered to have expired. This time is greater than that of Level 3. | ||
| + | |||
| + | When a Priority is assigned to a Request, this number of hours is calculated from the creation time, and this becomes the ''Due By'' date on the Request form. | ||
| + | |||
| + | ====Email to==== | ||
| + | Enter the email address of a user to send an email notification to alert them that the Request has expired. | ||
| + | |||
| + | ====Escalate to==== | ||
| + | Specify an Analyst to whom the Request should be assigned when the Request expires. | ||
| + | |||
| + | =Manual Setting on Request Form= | ||
In addition to pre-setting escalation and resolution times against a Priority, there is also the option to override these times or just set any escalation or resolution time manually. This is achieved by first setting the ''Allow Escalation Edit'' field to ''Yes'' in the '''Administration > Libraries > Priority > PRIORITY NAME'''. Any requests using that priority will prompt the Analyst or user to enter, edit or confirm the resolution and escalation times when the Request is saved. The confirmation screen is displayed on saving the request: | In addition to pre-setting escalation and resolution times against a Priority, there is also the option to override these times or just set any escalation or resolution time manually. This is achieved by first setting the ''Allow Escalation Edit'' field to ''Yes'' in the '''Administration > Libraries > Priority > PRIORITY NAME'''. Any requests using that priority will prompt the Analyst or user to enter, edit or confirm the resolution and escalation times when the Request is saved. The confirmation screen is displayed on saving the request: | ||
| Line 70: | Line 137: | ||
* An automatic email can be sent to a specified address | * An automatic email can be sent to a specified address | ||
* The Request can be automatically assigned to another Analyst | * The Request can be automatically assigned to another Analyst | ||
| − | * The Request itself as displayed in the list views, | + | * The Request itself as displayed in the list views, can change color. |
| − | The color setting is defined using '''[[Layton | + | The color setting is defined using '''[[Layton ServiceDesk - General_Settings - Request_Settings#Color_Options|Administration > General Settings > Request Settings]]'''. By default the Priority escalation color will only be applied to the Priority field in the list views, however if preferred this can be changed so that it colors the whole row. This color setting is found in '''[[Layton_ServiceDesk_-_General_Settings_-_Request_Settings#Color_Whole_Row|Administration > General Settings > Request Settings > Color Whole Row]]'''. |
Note: If a Request has a ''Suspend'' status all escalation is frozen until that status is changed to a status that does not have a suspend status on it. | Note: If a Request has a ''Suspend'' status all escalation is frozen until that status is changed to a status that does not have a suspend status on it. | ||
| − | = | + | =Site= |
| − | + | Priorities can be limited to specific Sites. In the list of Priorities, click the Edit button [[File:Lsd btn edit 16px.png|link=]] for the Priority to edit. | |
| − | + | ||
| − | <p align="right">[[Layton | + | |
| − | <p align="right">[[File:btn_back_up.png|link=User Guide for Layton | + | [[File:Lsd priority03.png|center|link=]] |
| + | |||
| + | |||
| + | Check the applicable Sites and close the dialog. | ||
| + | |||
| + | =Related Articles= | ||
| + | *'''[[Layton ServiceDesk - General Settings - Default Closed Periods|Default Closed Periods]]''' | ||
| + | *'''[[Layton ServiceDesk - General Settings - Default Working Hours|Default Working Hours]]''' | ||
| + | *'''[[Layton ServiceDesk - General Settings - Request Settings#Default Priority/SLA|Request Settings > Default Priority/SLA]]''' | ||
| + | *'''[[Layton ServiceDesk - General Settings - Business Rules|Business Rules]]''' | ||
| + | <p align="right">[[Layton ServiceDesk - Settings - Libraries - Problem Statuses|<U>Next article in this series: ''Problem Statuses''</u>]] [[File:Btn forward.png|link=Layton ServiceDesk - Settings - Libraries - Problem Statuses]]</p> | ||
| + | <p align="right">[[File:btn_back_up.png|link=User Guide for Layton ServiceDesk]] [[User Guide for Layton ServiceDesk|<u>Back to Contents</u>]]</p> | ||
Latest revision as of 02:50, 28 February 2020
![]() Previous article in this series: Task Types
Previous article in this series: Task Types
Contents |
[edit] Overview
Priorities dictate the importance of Requests and escalation times and routes. They are user configurable and are defined within a Priority, and although Priorities as such may not be required, in order to set any Priority, an Priority name or title is defined.
Generally the Priority of a Request (or Incident) is determined by the Impact and Urgency of the issue. For example an issue that is affecting a single user and has a high urgency would be given a lower Priority than an issue that is affecting the whole company and has a high urgency.
A Priority can be implemented using predefined resolution and escalation details. Alternatively, the resolution time and any escalation details can be set manually or the predefined values amended when logging a Request.
Even if no escalation or resolution times are needed, the Priority is still defined within a Priority title (but could be blank) but with no escalation parameters set. Priorities are defined in Administration > Libraries > Priority.
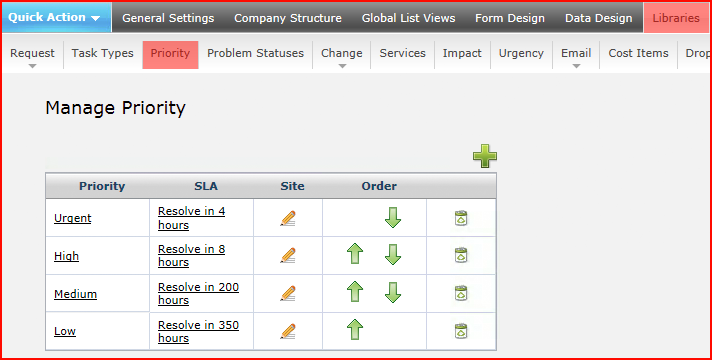
[edit] Setting Priority Order
Priorities can be set to an arbitrary sort order for display in the Priority menu on the Request form. Click the Up ![]() and Down
and Down ![]() buttons in the Order column to set the desired order.
buttons in the Order column to set the desired order.
[edit] Configuring the Priority
[edit] Deciding on Priority Configuration Options
Priorities can be configured as simple descriptions for a generalised priority, or they can be additionally configured with times that define escalation and expiry. Decide on how complex your needs are with the below table.
Escalation and resolution times take into account the Default Working Hours.
| Priority Requirement | Settings |
|---|---|
| No SLA needed, no expiry time or escalation details required but need to set Priorities | Define SLA with Name and Priorities only. Allow Escalation Edit set to No |
| No SLA needed but need to set expiry time and/or escalation details manually at request logging | As above but set Allow Escalation Edit set to Yes |
| SLA/Priority details required as preset, but also allow manual editing at request logging | Define SLA Name with Priorities and enter resolution and any escalation times. Also enter any email notification and auo-assignment of requests. Set Allow Escalation Edit to Yes |
| SLA/Priority details required as preset, but do not allow manual editing at request logging | As above, but set Allow Escalation Edit to No |
[edit] Settings Page
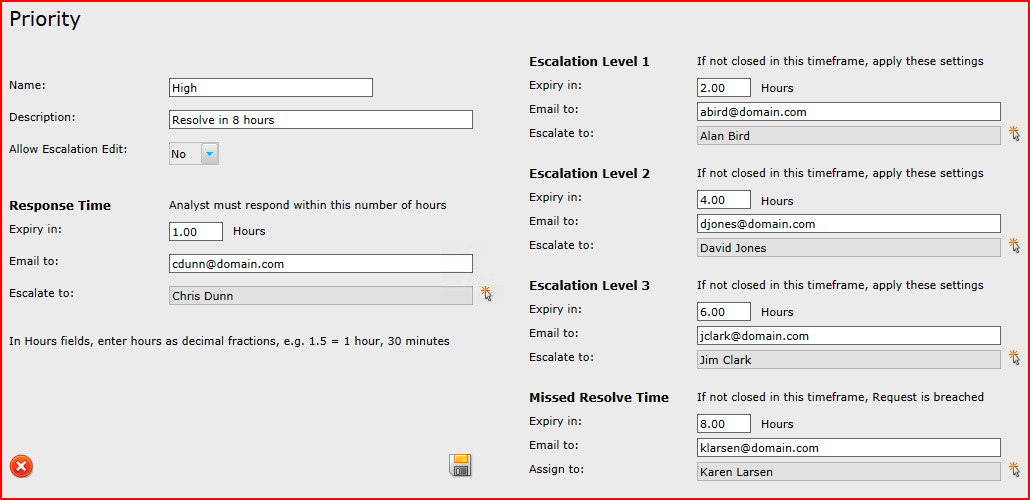
[edit] Basic Settings
[edit] Name
This is a name that will be a unique ID to represent this Priority.
[edit] Description
Enter a description for the SLA that the priority represents.
[edit] Allow Escalation Edit
If set to Yes, resolution and escalation times can be manually adjusted when saving the Request.
[edit] Response Time
The Analyst must respond within this number of hours. A response is defined as one of these actions, performed by the Analyst:
- Adding a new Comment
- Applying a Solution
- Changing Request Status.
[edit] Expiry in
The time from creation when the Request should be responded to. A response acknowledges the End User that the Request has been received and logged.
[edit] Email to
Specify an Analyst to be notified if no response has been recorded within the Expiry in value.
[edit] Escalate to
Specify an Analyst to whom the Request should be assigned if no response has been recorded within the Expiry in value.
[edit] Escalation Levels
There are three levels of escalation before the resolution time expires.
[edit] Escalation Level 1
[edit] Expiry in
The time from creation when the Request will be escalated.
[edit] Email to
Enter the email address of a user to send an email notification to alert them that an escalation point has been reached.
[edit] Escalate to
Specify an Analyst to whom the Request should be assigned when the escalation time reaches Level 1.
[edit] Escalation Level 2
[edit] Expiry in
The time from creation when the Request will be escalated. This time is greater than that of Level 1.
[edit] Email to
Enter the email address of a user to send an email notification to alert them that an escalation point has been reached.
[edit] Escalate to
Specify an Analyst to whom the Request should be assigned when the escalation time reaches Level 2.
[edit] Escalation Level 3
[edit] Expiry in
The time from creation when the Request will be escalated. This time is greater than that of Level 2.
[edit] Email to
Enter the email address of a user to send an email notification to alert them that an escalation point has been reached.
[edit] Escalate to
Specify an Analyst to whom the Request should be assigned when the escalation time reaches Level 3.
[edit] Missed Resolve Time
[edit] Expiry in
The time from creation when the Request will be considered to have expired. This time is greater than that of Level 3.
When a Priority is assigned to a Request, this number of hours is calculated from the creation time, and this becomes the Due By date on the Request form.
[edit] Email to
Enter the email address of a user to send an email notification to alert them that the Request has expired.
[edit] Escalate to
Specify an Analyst to whom the Request should be assigned when the Request expires.
[edit] Manual Setting on Request Form
In addition to pre-setting escalation and resolution times against a Priority, there is also the option to override these times or just set any escalation or resolution time manually. This is achieved by first setting the Allow Escalation Edit field to Yes in the Administration > Libraries > Priority > PRIORITY NAME. Any requests using that priority will prompt the Analyst or user to enter, edit or confirm the resolution and escalation times when the Request is saved. The confirmation screen is displayed on saving the request:
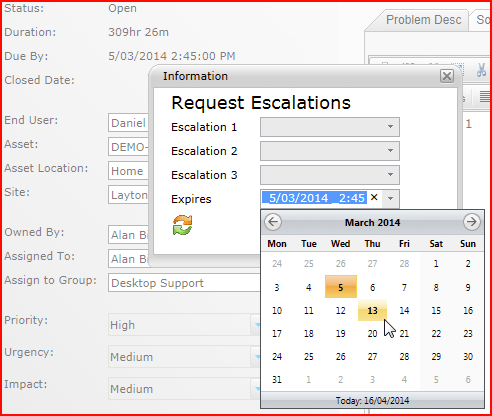
Enter or amend any escalation times or the expiry time and click the Confirm button ![]() .
.
To revert to any predefined values for the Priority, click the Restore to Default button ![]() . After a brief pause, all the escalation dates and times will be populated with the original values.
. After a brief pause, all the escalation dates and times will be populated with the original values.
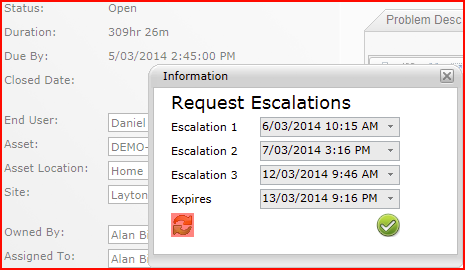
Click the Confirm button ![]() to confirm the defaults.
to confirm the defaults.
[edit] Summary of Escalation Process
The escalation process will be initiated when the resolve time or any escalation level is exceeded. The following processes can be invoked using the Priority form:
- An automatic email can be sent to a specified address
- The Request can be automatically assigned to another Analyst
- The Request itself as displayed in the list views, can change color.
The color setting is defined using Administration > General Settings > Request Settings. By default the Priority escalation color will only be applied to the Priority field in the list views, however if preferred this can be changed so that it colors the whole row. This color setting is found in Administration > General Settings > Request Settings > Color Whole Row.
Note: If a Request has a Suspend status all escalation is frozen until that status is changed to a status that does not have a suspend status on it.
[edit] Site
Priorities can be limited to specific Sites. In the list of Priorities, click the Edit button ![]() for the Priority to edit.
for the Priority to edit.
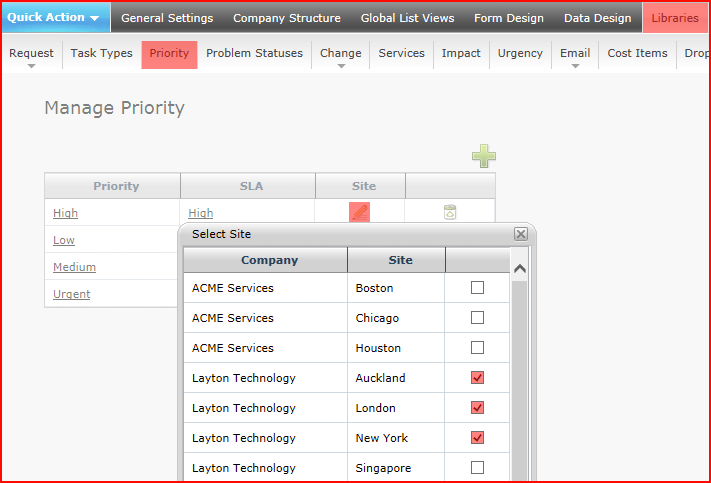
Check the applicable Sites and close the dialog.