Layton ServiceDesk - Configuring the System - Analyst Settings
(→Email Signature) |
(Added image, minor formatting changes) |
||
| Line 1: | Line 1: | ||
<p align="right">[[File:btn_back_up.png|link=User Guide for Layton ServiceDesk™]] [[User Guide for Layton ServiceDesk™|<u>Back to Contents</u>]]</p> | <p align="right">[[File:btn_back_up.png|link=User Guide for Layton ServiceDesk™]] [[User Guide for Layton ServiceDesk™|<u>Back to Contents</u>]]</p> | ||
=Overview= | =Overview= | ||
| − | Individual Analyst settings | + | Individual Analyst settings can be accessed by clicking the Settings button in the menu bar. There are four sub menu items available to set: Home Screen, List View Settings and QuickAction Menu and Password. |
| − | |||
| + | [[File:Lsd analyst stgs01.png|center|link=|Analyst Settings]] | ||
| + | |||
| + | |||
| + | While these settings are related to the Analysts’ views, there is a much greater range of Analyst settings, such as security and Skill settings, which are accessed through '''[[Layton ServiceDesk™ - Settings - Company Structure - Manage Analyst|Manage Analyst]]'''. | ||
=My Password= | =My Password= | ||
| − | This allows the Analyst to change their password. Enter the existing or | + | This allows the Analyst to change their password. Enter the existing or ''Old Password'' and then the ''New Password'' and re-enter this in the next field and click the ''Save'' button to update the password. |
=Home Screen= | =Home Screen= | ||
This function defines the Home Screen or the page displayed for each Analyst on entering the system. This allows each Analyst to have a different home screen. This screen is also displayed when Home is selected from the Main Menu. There are five different options available: | This function defines the Home Screen or the page displayed for each Analyst on entering the system. This allows each Analyst to have a different home screen. This screen is also displayed when Home is selected from the Main Menu. There are five different options available: | ||
| − | + | {| class="wikitable" border="1" | |
| − | + | |- | |
| − | + | ! style="background:#009999; width: 150px; color: #FFFFFF"|Setting | |
| − | + | ! style="background:#009999; width: 850px; color: #FFFFFF"|Description | |
| − | + | |- | |
| − | + | |Auto Refresh Interval | |
| − | + | |The interval in which the system will refresh the Analyst's screen. The range is from ''Never'' to ''30 Minutes''. | |
| − | + | |- | |
| − | + | |Home Screen | |
| + | |This defines the page displayed when the Analyst logs into the system or clicks on the ''Home'' button. | ||
| + | |- | ||
| + | |View Requests Home Screen | ||
| + | |This defines the view displayed when the Analyst selects the ''Home > View Requests'' sub-menu item. This can be the same as or different to the ''Home Screen'' selection. | ||
| + | |- | ||
| + | |View Problems Home Screen | ||
| + | |This option will be displayed if the Problem & Change function is enabled. This defines the view displayed when the Analyst selects the ''Home > View Problems'' sub-menu item. This can be the same as or different to the ''Home Screen'' selection. | ||
| + | |- | ||
| + | |View Changes Home Screen | ||
| + | |This option will be displayed if the Problem & Change function is enabled. This defines the view displayed when the Analyst selects the ''Home > View Changes'' sub-menu item. This can be the same as or different to the ''Home Screen'' selection. | ||
| + | |} | ||
=List View Settings= | =List View Settings= | ||
| Line 31: | Line 45: | ||
| − | + | [[File:Fig16.png|center|link=|Quick Action Menu]] | |
| − | + | ||
| − | + | ||
| − | + | ||
To customize the Quick Action list select the Customize menu option and you will then be presented with the QuickAction menu page where items can be added or removed from the QuickAction list. See Figure 17 below. The left hand selection panel contains the items available for section and the right hand panel contains the items that have been selected. | To customize the Quick Action list select the Customize menu option and you will then be presented with the QuickAction menu page where items can be added or removed from the QuickAction list. See Figure 17 below. The left hand selection panel contains the items available for section and the right hand panel contains the items that have been selected. | ||
| − | + | ||
To add an item to the QuickStart menu select it in the left hand panel and click the single arrow button which will add the item to the QuickAction list. Selecting the double arrow will move all items from one list to the other. Items can be moved up or down in the list by selecting the up or down arrows or by dragging the item to the desired location. | To add an item to the QuickStart menu select it in the left hand panel and click the single arrow button which will add the item to the QuickAction list. Selecting the double arrow will move all items from one list to the other. Items can be moved up or down in the list by selecting the up or down arrows or by dragging the item to the desired location. | ||
| − | + | ||
Once the QuickAction list has been selected click the Save button to save the setting. | Once the QuickAction list has been selected click the Save button to save the setting. | ||
| − | |||
| − | + | ||
| − | + | [[File:Fig17.png|center|link=|Quick Action Selection]] | |
| − | + | ||
<p align="right">[[File:btn_back_up.png|link=User Guide for Layton ServiceDesk™]] [[User Guide for Layton ServiceDesk™|<u>Back to Contents</u>]]</p> | <p align="right">[[File:btn_back_up.png|link=User Guide for Layton ServiceDesk™]] [[User Guide for Layton ServiceDesk™|<u>Back to Contents</u>]]</p> | ||
Revision as of 22:44, 25 November 2013
Contents |
Overview
Individual Analyst settings can be accessed by clicking the Settings button in the menu bar. There are four sub menu items available to set: Home Screen, List View Settings and QuickAction Menu and Password.
While these settings are related to the Analysts’ views, there is a much greater range of Analyst settings, such as security and Skill settings, which are accessed through Manage Analyst.
My Password
This allows the Analyst to change their password. Enter the existing or Old Password and then the New Password and re-enter this in the next field and click the Save button to update the password.
Home Screen
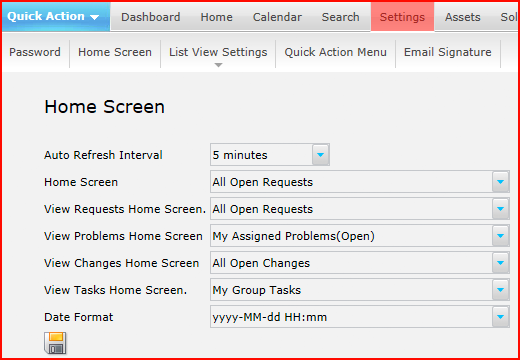
This function defines the Home Screen or the page displayed for each Analyst on entering the system. This allows each Analyst to have a different home screen. This screen is also displayed when Home is selected from the Main Menu. There are five different options available:
| Setting | Description |
|---|---|
| Auto Refresh Interval | The interval in which the system will refresh the Analyst's screen. The range is from Never to 30 Minutes. |
| Home Screen | This defines the page displayed when the Analyst logs into the system or clicks on the Home button. |
| View Requests Home Screen | This defines the view displayed when the Analyst selects the Home > View Requests sub-menu item. This can be the same as or different to the Home Screen selection. |
| View Problems Home Screen | This option will be displayed if the Problem & Change function is enabled. This defines the view displayed when the Analyst selects the Home > View Problems sub-menu item. This can be the same as or different to the Home Screen selection. |
| View Changes Home Screen | This option will be displayed if the Problem & Change function is enabled. This defines the view displayed when the Analyst selects the Home > View Changes sub-menu item. This can be the same as or different to the Home Screen selection. |
List View Settings
This allows each individual Analyst to personalize their list view settings, provided they have been given permission to do so. The permission settings are found in Administration | Company Structure | Manage Analyst | Settings | Access Restrictions.
For more information on how to modify list views please refer to GLOBAL LIST VIEWS / ANALYST LIST VIEWS.
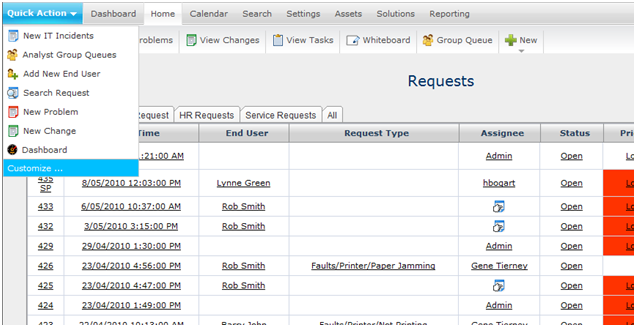
Quick Action
The QuickAction menu has been designed to provide Analysts with quick and easy access to the most common actions, irrespective of where they are within the application at any point in time. The items displayed within the Quick Action menu can be defined by each Analyst. See Figure 16 below with a sample QuickAction drop down list displayed.
To customize the Quick Action list select the Customize menu option and you will then be presented with the QuickAction menu page where items can be added or removed from the QuickAction list. See Figure 17 below. The left hand selection panel contains the items available for section and the right hand panel contains the items that have been selected.
To add an item to the QuickStart menu select it in the left hand panel and click the single arrow button which will add the item to the QuickAction list. Selecting the double arrow will move all items from one list to the other. Items can be moved up or down in the list by selecting the up or down arrows or by dragging the item to the desired location.
Once the QuickAction list has been selected click the Save button to save the setting.
Email Signature
This allows you to create a custom email signature. Settings -> Email Signature