AuditWizard - Installation Types - Remote Auditing - Email Method
m (Minor formatting changes) |
m (Minor formatting changes) |
||
| Line 11: | Line 11: | ||
==Steps== | ==Steps== | ||
| − | 1. Configure the Scanner to audit the items you want in Administration > Auditing > AuditScanner Configuration. Save the configuration with the name ''Email''. | + | 1. Configure the Scanner to audit the items you want in '''[[AuditWizard - Using AuditWizard - Administration - Auditing - AuditScanner Configuration|Administration > Auditing > AuditScanner Configuration]]'''. Save the configuration with the name ''Email''. |
2. Navigate to C:\Program Files\AuditWizard v8\Scanners\. | 2. Navigate to C:\Program Files\AuditWizard v8\Scanners\. | ||
| Line 31: | Line 31: | ||
8. Zip AuditScanner.xml and AuditScanner.exe into a zip file. Send this to your user. Send them '''[[AuditWizard - Installation Types - Remote Auditing - Email Method - User Instructions|a link to the separate user instructions for deployment]]'''. | 8. Zip AuditScanner.xml and AuditScanner.exe into a zip file. Send this to your user. Send them '''[[AuditWizard - Installation Types - Remote Auditing - Email Method - User Instructions|a link to the separate user instructions for deployment]]'''. | ||
| − | 9. When you receive the | + | 9. When you receive the user's .ADF files, put them in the data folder in your network share and they will be processed with the ones produced locally. |
==How it Works== | ==How it Works== | ||
Latest revision as of 21:02, 5 June 2020
Contents |
[edit] Email Method
[edit] Use Case
- Computers that do not have a direct connection to the local network
- Computers that are rarely on the local network and thus have no connection to the AuditWizard share.
- FTP is not an option.
- Need for auditing is infrequent.
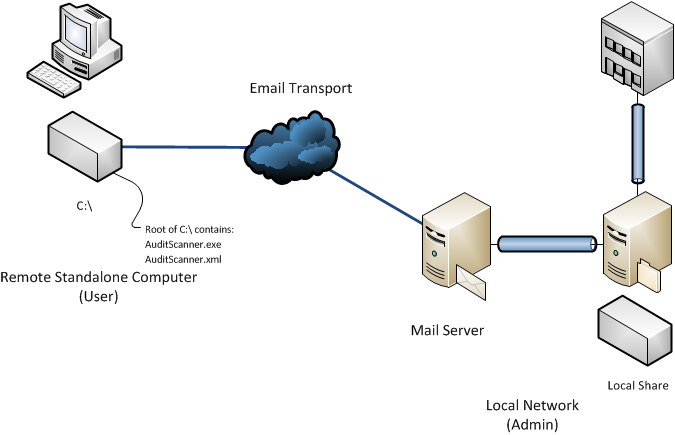
[edit] Network Configuration
[edit] Steps
1. Configure the Scanner to audit the items you want in Administration > Auditing > AuditScanner Configuration. Save the configuration with the name Email.
2. Navigate to C:\Program Files\AuditWizard v8\Scanners\.
3. Copy Email.xml to the desktop. Rename it as AuditScanner.xml.
4. Open the new copy of AuditScanner.xml. Look for the tag <DeployPathRoot>. Replace the path with C:. Repeat this with the tags <DeployPathScanner> and <DeployPathData>. This should be the result:
   <DeployPathRoot>C:</DeployPathRoot>
   <DeployPathScanner>C:</DeployPathScanner>
   <DeployPathData>C:</DeployPathData>
5. Save the file.
6. Navigate to C:\Program Files\AuditWizard v8\.
7. Copy AuditScanner.exe to the desktop.
8. Zip AuditScanner.xml and AuditScanner.exe into a zip file. Send this to your user. Send them a link to the separate user instructions for deployment.
9. When you receive the user's .ADF files, put them in the data folder in your network share and they will be processed with the ones produced locally.
[edit] How it Works
The user runs the Scanner .exe directly and produces an immediate result in the form of an .ADF file that they email to you. You copy it to the data folder in your local network share and it is uploaded along with audit files produced locally.
When the Scanner executable is upgraded, usually every two to three versions of the application, the above process will need to be redone for each computer.