Layton ServiceDesk - General Settings - Business Rules
Contents |
Overview
Business Rules perform If/Then tests with and/or operators.
Disabling Business Rules
A Business Rule can be disabled without deleting it. From list view, uncheck the checkbox in the Enabled column for the Business Rule. Alternatively, uncheck the Enabled checkbox in the properties of the Business Rule.
Preventing Business Rules from Executing
It may be desirable to apply a Business Rule once, for example, assigning a Request to a first-level tech. On subsequent saves of the Request, the assigned Analyst should not be reset to the value defined by the Business Rule, in case manual reassignment has occurred.
Procedure
- Go to Administration > Form Design > FORM NAME.
- Click the field that has a Business Rule configuration.
- Uncheck the option Ignore Business Rule Value When Creating New Request and/or Ignore Business Rule Value When Updating Existing Request.
- Click the Save button
 .
.
Criteria
Problem Summary
Field Name: sys_problemsummary
This field is the short description on the Request form, and correlates to the subject line of an email, when processed as a new Request.
Problem Description
Field Name: sys_problemdesc
This criterion will be used to test the presence or absence of a defined string. Note that this can be used to process Requests that have been manually created or imported from email. In the case of email, the Request will be imported, saved, then the Business Rule will be applied.
Examples of Use
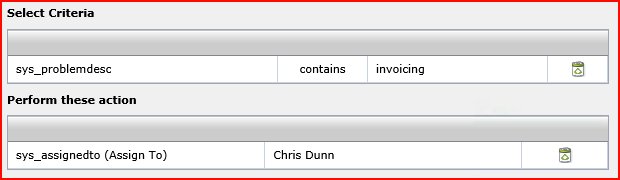
Reassignment Based on a String
When an email is processed as a new Request and contains the string invoicing, the Request can be assigned to a specific Analyst.
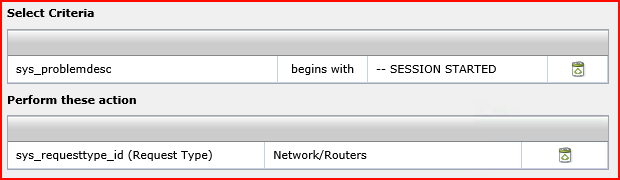
Assignment of Request Type Based on String
A network router is configured to email a log dump. Requests containing a log dump can be reassigned to a specific Request Type, regardless of whether the Analyst set one or not, thus enforcing an internal policy.
Procedure
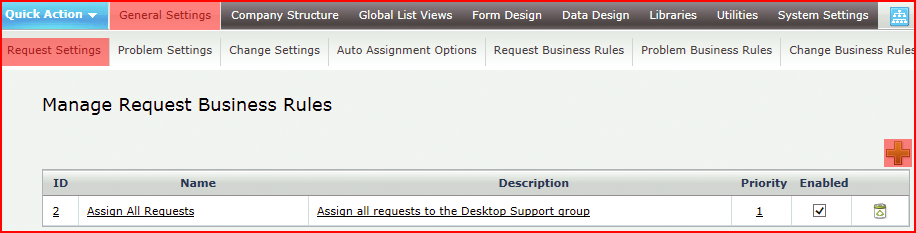
- Go to Administration > General Settings > Business Rules. To add a new rule, click the Add button
 .
.
- The following window is displayed:
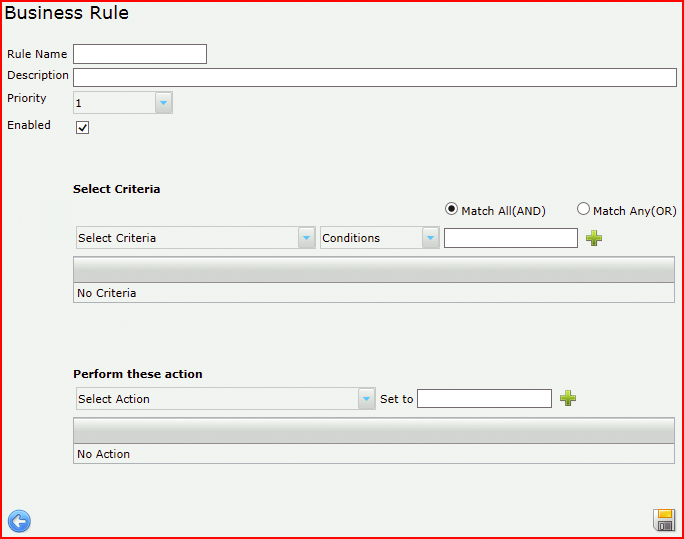
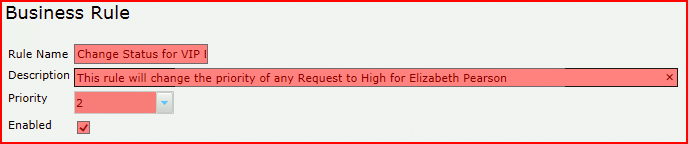
- In the following example, the rule will always set the Priority to High if the End User is Elizabeth Pearson. She is considered to be a VIP and we want the High Priority regardless of what it is set to manually. Enter the rule name, a short description and set a priority. Priority in this context defines the sequence in which rules will be executed, lowest number to highest. To make this business rule active, check the Enabled checkbox.
- Select a column name in the Select Criteria menu. Select a condition in the Conditions menu. Enter a value in the value field or select it from a list, if applicable. Click the Add button
 to add it to the list of criteria. This is most important, otherwise the criterion will not be saved.
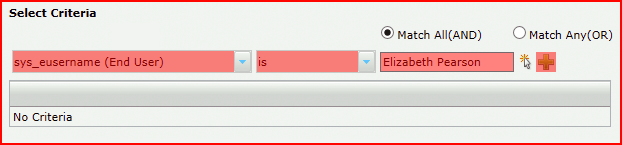
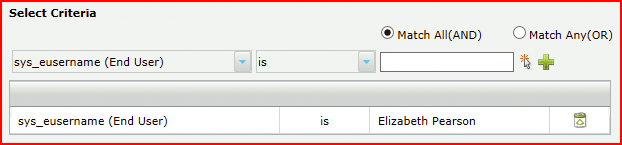
- When saved, the criterion will appear in a list. Note that multiple criteria can be defined in the one Business Rule. Also note the two options Match All (AND) and Match Any (OR), which will define whether all the specified criteria or any of them will be tested.
- Similarly, select an action from the Select Action menu and enter a value in the value field or select it from a list, if applicable. Click the Add button to add it to the list of criteria. Again, this must be done to save the action. Multiple actions can be defined in the same Business Rule.

- Click the Save button to save the Business Rule.