Layton ServiceDesk - Settings - Libraries - Request Classes
m (Jpainter moved page Layton ServiceDesk™ - Settings - Libraries - Request Classes to Layton ServiceDesk - Settings - Libraries - Request Classes: Removed the TM symbol for a cleaner URL) |
m (Updated links) |
||
| Line 1: | Line 1: | ||
| − | <p align="right">[[File:btn_back_up.png|link=User Guide for Layton | + | <p align="right">[[File:btn_back_up.png|link=User Guide for Layton ServiceDesk]] [[User Guide for Layton ServiceDesk|<u>Back to Contents</u>]]</p> |
__FORCETOC__ | __FORCETOC__ | ||
=Overview= | =Overview= | ||
| Line 24: | Line 24: | ||
===Reply Email=== | ===Reply Email=== | ||
| − | If an email address is entered here, the reply-to address in outgoing email will be changed to this email address. If End Users reply to an email notification from a Request with this Request Class, the email will go to this address. An example of use would be two Request Classes, ''IT Requests'', that is the bulk of the traffic, and ''Maintenance'', which is much less. If a Maintenance Request is closed, the End User may respond to the closure notification. Instead of this going to the '''[[Layton | + | If an email address is entered here, the reply-to address in outgoing email will be changed to this email address. If End Users reply to an email notification from a Request with this Request Class, the email will go to this address. An example of use would be two Request Classes, ''IT Requests'', that is the bulk of the traffic, and ''Maintenance'', which is much less. If a Maintenance Request is closed, the End User may respond to the closure notification. Instead of this going to the '''[[Layton ServiceDesk - Settings - System Settings - Email Server Settings#Incoming|global Incoming email account]]''', it would be sent to this account, which can be managed manually through an email client. The idea is to reroute mail that you don't want to be processed by the system. |
===Add To New Analyst=== | ===Add To New Analyst=== | ||
| Line 51: | Line 51: | ||
#Click the the Save button [[File:Lsd btn save.png|link=]] to save the settings. | #Click the the Save button [[File:Lsd btn save.png|link=]] to save the settings. | ||
#To cancel without modifying the setting, click the Cancel button [[File:Lsd btn cancel 24px.png|link=]] or the close button in the upper-right corner of the dialog. | #To cancel without modifying the setting, click the Cancel button [[File:Lsd btn cancel 24px.png|link=]] or the close button in the upper-right corner of the dialog. | ||
| − | <p align="right">[[Layton | + | <p align="right">[[Layton ServiceDesk - Settings - Libraries - Request Types|<U>Next article in this series: ''Request Types''</u>]] [[File:Btn forward.png|link=Layton ServiceDesk - Settings - Libraries - Request Types]]</p> |
| − | <p align="right">[[File:btn_back_up.png|link=User Guide for Layton | + | <p align="right">[[File:btn_back_up.png|link=User Guide for Layton ServiceDesk]] [[User Guide for Layton ServiceDesk|<u>Back to Contents</u>]]</p> |
Revision as of 05:45, 8 July 2016
Contents |
Overview
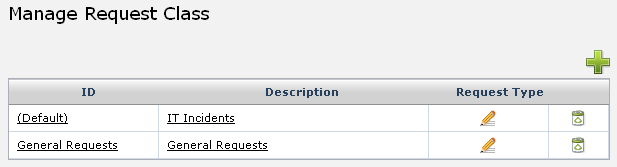
A Request Class defines a major area of the operation to which Requests will be assigned, e.g. Service Request, Building Maintenance, HR, IT Incident. This is the broadest categorisation of requests. The naming and number is up to you. The minimum number of Request Classes is one.
When a new Request Class is initially created, it will inherit its associated Forms from the (Default) Request Class. By default Layton ServiceDesk ships with two Request Classes, (Default), which is intended for IT incidents, such as Computer Stopped Working, and General Requests, which are service requests, such as Install Software X.
Each Request Class is associated with a set of Analyst, End User and Analyst Spawn forms. These forms can be customized to suit the requirements of the Request Class. For example, though you may have a number of user-defined fields related to HR, you wouldn't put them on an IT Request form. You can customize the forms for HR to suit HR.
Adding a New Request Class
Click the Add button ![]() and the add Request Class dialog is displayed:
and the add Request Class dialog is displayed:
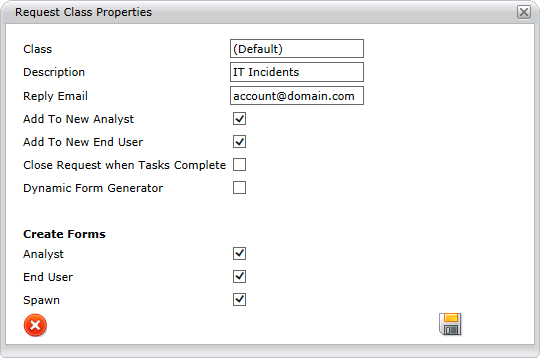
Settings
Class
A unique Request Class name. This appears as the name in the ID column on the Manage Request Class page and is the unique identifier used to refer to the Request Class.
Description
A short description of what the Request Class apples to.
Reply Email
If an email address is entered here, the reply-to address in outgoing email will be changed to this email address. If End Users reply to an email notification from a Request with this Request Class, the email will go to this address. An example of use would be two Request Classes, IT Requests, that is the bulk of the traffic, and Maintenance, which is much less. If a Maintenance Request is closed, the End User may respond to the closure notification. Instead of this going to the global Incoming email account, it would be sent to this account, which can be managed manually through an email client. The idea is to reroute mail that you don't want to be processed by the system.
Add To New Analyst
Automatically gives access to this Request Class for any new Analysts.
Add To New End User
Automatically gives access to this Request Class for any new End Users.
Close Request when Tasks Complete
The Request will automatically close when associated tasks are completed.
Dynamic Form Generator
Create Forms
Analyst
End User
Spawn
Restricting Request Types to Request Classes
Request Classes can also be linked to Request Types so only certain Request Types are displayed for a particular Request Class. This is useful for filtering out Request Types that don't apply to this Request Class.
- To link a Request Class to a Request Type, on the Manage Request Class page, click the Edit button
 in the Request Type column and a window will display the Request Types:
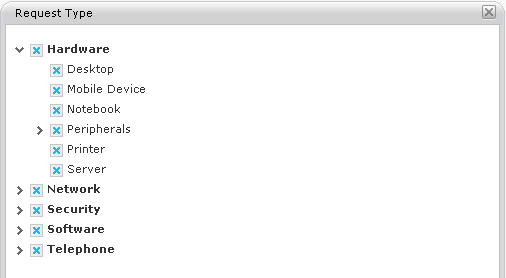
- Check the Request Types that are to be available when logging a request for this Request Class.
- Click the the Save button
 to save the settings.
- To cancel without modifying the setting, click the Cancel button
 or the close button in the upper-right corner of the dialog.