Layton ServiceDesk - Settings - Libraries - Email Keywords
(Major revision for 6.6.3) |
|||
| (8 intermediate revisions by one user not shown) | |||
| Line 1: | Line 1: | ||
| − | <p align="right">[[File:btn_back_up.png|link=User Guide for Layton | + | <p align="right">[[File:btn_back_up.png|link=User Guide for Layton ServiceDesk]] [[User Guide for Layton ServiceDesk|<u>Back to Contents</u>]]</p> |
| − | Previous article in this series: '''[[Layton ServiceDesk™ - | + | <p align="right">[[File:btn_back_up.png|link=Layton ServiceDesk™ - Settings - Libraries - Urgency]] [[Layton ServiceDesk™ - Settings - Libraries - Urgency |<u>Previous article in this series: ''Urgency''</u>]]</p> |
| + | __FORCETOC__ | ||
| + | =Overview= | ||
| + | ''Email Keywords'' are keywords that are used to assign any combination of Request Types, Request Classes or Statuses to incoming emails that are processed as requests (see '''[[Layton ServiceDesk™ - Using Layton ServiceDesk (End User) - Lodging a New Request Via Email|Lodging a New Request Via Email]]'''). Email Keywords help to simplify the processing of incoming emails for commonly requested issues. | ||
| − | '' | + | For example, you can set up the keyword ''network'' against the Request Type ''Network'', then if an incoming email arrives with the keyword ''Network'' in the subject line or email body, it will match the keyword to the Request Type ''Network'' and create the Request with the ''Network'' Request Type. The Request can then be automatically assigned to an Analyst or Analyst Group with the appropriate '''[[Layton ServiceDesk - Settings - Company Structure - Manage Analyst#Skills|Skills]]''' and given a Priority if one is pre-defined for the ''Network'' Request Type. |
| − | |||
| − | + | [[File:Lsd email keywords01.png|center|link=]] | |
| − | <p align="right">[[File:btn_back_up.png|link=User Guide for Layton | + | |
| + | =Procedure= | ||
| + | Note: Any combination of Request Type, Request Class and Request Status can be configured. To leave the Request Type unchanged, don't specify a Request Type. To leave the Request Class or Request Status unchanged, select ''No Change'' in the corresponding menu. This will not alter the value of the field from whatever was set at the time of processing. | ||
| + | |||
| + | #Click the the Add button [[File:Lsd btn plus.png|link=]].<br /><p>[[File:Lsd email keywords02.png|link=]]</p><br /> | ||
| + | #''Match'' Section (Keyword to match): | ||
| + | ##Enter the keyword in the ''Keyword'' field. | ||
| + | ##If it's important to distinguish this keyword from other words due to case sensitivity, check the ''Case Sensitive'' checkbox. | ||
| + | #''Set'' Section (Fields to be set based on the Match criteria): | ||
| + | ##Click the Select button [[File:Lsd btn select 16px.png|link=]] next to the ''Request Type'' field. In the Request Types dialog, click the desired Request Type. To subsequently clear the selected Request Type, click the Clear button [[File:Lsd btn clear 16px.png|link=]] in the Edit Email Keyword dialog. | ||
| + | ##Select the Request Class that you want to associate with the keyword in the ''Request Class'' menu. If no change is desired, select ''No Change''. | ||
| + | ##Select the Request Status that you want to associate with the keyword in the ''Request Status'' menu. If no change is desired, select ''No Change''. | ||
| + | #Click the Save button [[File:Lsd btn save.png|link=]]. | ||
| + | <p align="right">[[Layton ServiceDesk™ - Settings - Libraries - Email Settings & Bodies |<u>Next article in this series: ''Email Settings & Bodies''</u>]] [[File:Btn forward.png|link=Layton ServiceDesk - Settings - Libraries - Email Settings & Bodies]]</p> | ||
| + | <p align="right">[[File:btn_back_up.png|link=User Guide for Layton ServiceDesk]] [[User Guide for Layton ServiceDesk|<u>Back to Contents</u>]]</p> | ||
Latest revision as of 01:22, 30 August 2016
![]() Previous article in this series: Urgency
Previous article in this series: Urgency
Contents |
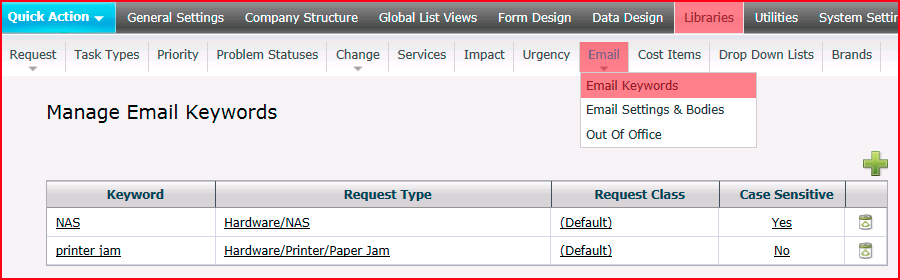
[edit] Overview
Email Keywords are keywords that are used to assign any combination of Request Types, Request Classes or Statuses to incoming emails that are processed as requests (see Lodging a New Request Via Email). Email Keywords help to simplify the processing of incoming emails for commonly requested issues.
For example, you can set up the keyword network against the Request Type Network, then if an incoming email arrives with the keyword Network in the subject line or email body, it will match the keyword to the Request Type Network and create the Request with the Network Request Type. The Request can then be automatically assigned to an Analyst or Analyst Group with the appropriate Skills and given a Priority if one is pre-defined for the Network Request Type.
[edit] Procedure
Note: Any combination of Request Type, Request Class and Request Status can be configured. To leave the Request Type unchanged, don't specify a Request Type. To leave the Request Class or Request Status unchanged, select No Change in the corresponding menu. This will not alter the value of the field from whatever was set at the time of processing.
- Click the the Add button
 .
.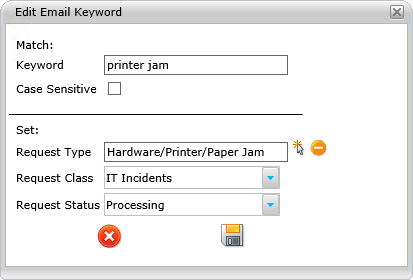
- Match Section (Keyword to match):
- Enter the keyword in the Keyword field.
- If it's important to distinguish this keyword from other words due to case sensitivity, check the Case Sensitive checkbox.
- Set Section (Fields to be set based on the Match criteria):
- Click the Select button
 next to the Request Type field. In the Request Types dialog, click the desired Request Type. To subsequently clear the selected Request Type, click the Clear button
  in the Edit Email Keyword dialog.
- Select the Request Class that you want to associate with the keyword in the Request Class menu. If no change is desired, select No Change.
- Select the Request Status that you want to associate with the keyword in the Request Status menu. If no change is desired, select No Change.
- Click the Select button
- Click the Save button
 .
.