Layton ServiceDesk - Logging a New Task
Contents |
Overview
Tasks are scheduled activities that are required to be performed by an Analyst. They are normally allocated to a Request, Problem or Change at the time that it is logged however they can also be linked later or can be free standing and not linked to a Request, Problem or Change. Therefore, a Task could be a planned maintenance event or action required at any time in the future.
Important: Task Types should be defined prior to creating tasks, as they will need to be specified on the Task form. Go to Administration > Libraries > Task Types to create and edit Task Types.
List View
Tasks can be viewed in Home > View Tasks. Tasks will be displayed in order of ascending Scheduled Date but can be reordered by selecting any column heading to sort ascending and selecting again for descending.

Creating a New Task
Starting Point
There are two ways to begin creating a Task, either from the home page or, if associated with a Request, Problem or Change, through a tab in the Request, Problem or Change forms.
Starting from the Toolbar or Tasks Tab
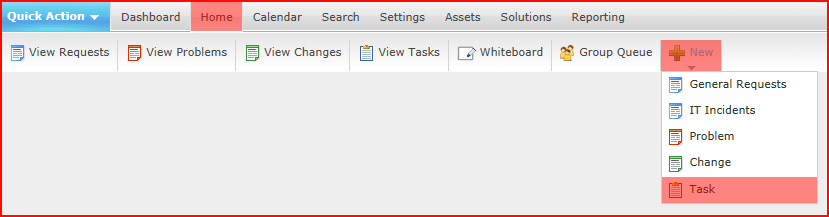
To create a new task from the Tasks tab, (usually not associated with a Request, Problem or Change), select New > Task from the toolbar, or click Home > View Tasks and click the Add button ![]() .
.
Starting from the Request, Problem or Change Form
On any of the Request, Problem or Change forms, click the Tasks tab![]() to display any linked Tasks. Click the Add button
to display any linked Tasks. Click the Add button ![]() .
.
New Task Form
The form looks the same regardless of the manner in which you begin.

Description of Fields
| Field | Description |
|---|---|
| Task | Task Identity Number. Automatically incremented by one starting from zero. This field is not modifiable by the Analyst. |
| Date Placed | Date Task allocated. Defaults to current date. Click the Select button |
| Task Type | Click the Select button |
| Analyst | Analyst assigned to the Task. Defaults to logged on Analyst. Click the Select button |
| Request ID | Auto populates with Request ID. Note that you can assign a Request ID if you started from the Task tab in the toolbar and not the Request form. |
| Problem ID | Auto populates with the Problem ID. Note that you can assign a Problem ID if you started from the Task tab in the toolbar and not the Problem form. |
| Change ID | Auto populates with the Change ID. Note that you can assign a Change ID if you started from the Task tab in the toolbar and not the Change form. |
| Status | Status of Task, select either Scheduled or Completed. Defaults to Scheduled. |
| Scheduled Date | Click the Select button |
| Complete Date | Click the Select button |
| Task Description | Full description of Task. |
Completing a Task
From the Tasks Tab on the Home Page
- Go to Home > View Tasks.
- Open the Task to be completed.
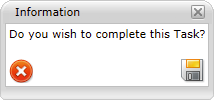
- Click the Complete button
 . A confirmation dialog will appear. Click the Save button
  to confirm.
From the Tasks tab in a Request, Problem or Change Form
- Click the Tasks tab
 .
.
- Click the Complete Task button
 next to the Task to be completed.
- Confirm in the confirmation dialog as above.
Recurring Tasks
Recurring Tasks are Tasks that are created automatically according to a pre-defined schedule and are typically used for routine maintenance activities. A Recurring Task can be an individual task or a number of Tasks with a dependency workflow.
To create a Recurring Task, click View Tasks from the Analyst Home screen. Select the Recurring Task tab and click the Add button ![]() and in the pop up window specify the name and schedule. When this window is saved, the Task Form will be displayed. Complete the Task template then click save to add the Task to the schedule. Please note that the following system fields on the Task form will not be available for selection as they we be automatically generated when the Task is created; Date Placed, Status, Scheduled Date, Completed Date. Also the Request ID, Problem ID & Change ID fields are not editable as the Recurring Task can only be linked to a specific Request, Problem or Change.
and in the pop up window specify the name and schedule. When this window is saved, the Task Form will be displayed. Complete the Task template then click save to add the Task to the schedule. Please note that the following system fields on the Task form will not be available for selection as they we be automatically generated when the Task is created; Date Placed, Status, Scheduled Date, Completed Date. Also the Request ID, Problem ID & Change ID fields are not editable as the Recurring Task can only be linked to a specific Request, Problem or Change.
To add more Tasks to this Recurring Task schedule, click the Add button and create another Task. If a dependency workflow is required, click on the Dependency column and specify the required dependence.
To view, edit or add another Task for an existing Recurring Task schedule, click on the Tasks icon for the relevant Recurring Task.
The Recurring Tasks are managed from the View Tasks section of the home screen. This option is an Analyst Security Setting which can be found in Administration > Company Structure > Manage Analyst > Settings > Access Restrictions Tab > Recurring Task Access.